


In this walkthrough, you’ll learn everything you need to know about RAW drive recovery: what “RAW” actually means, why it happens, how to get your files back in one piece, and how to fix the drive without making the problem worse. We tested the tools and methods presented here with our QA team, so you can follow the recovery process with a clearer idea of what each step does and where the risks are.
What Is a RAW Drive (and Why Does It Happen)?
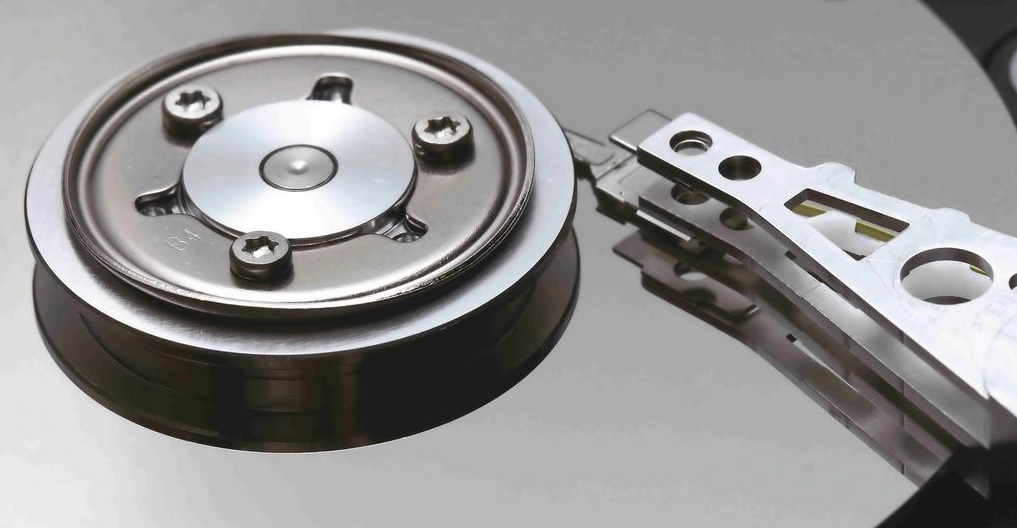
The term “RAW hard drive” refers to any hard drive whose file system has become corrupted or unreadable by the operating system. Since the OS can’t identify whether the drive is formatted as NTFS, FAT32, exFAT, or any other file system type, it instead marks it as “RAW” in the Disk Management tool in Windows or its counterparts on other operating systems.
Common causes of a drive becoming RAW include:
- 😧 User error during partitioning
- ❌ Interrupted disk operations damaging critical file system metadata
- ⚙️ Hardware issues like bad sectors, head crashes, or mechanical failures
- 🪫 Power surges or voltage fluctuations that cause data corruption or physical damage
- 💽 Hard drive firmware problems
- ⌛️ Natural wear and tear that causes the drive’s lifespan to be exceeded
The problem is that the file system essentially serves the same function as a map or table of contents for your data. As The Linux Information Project explains,
file systems provide “a very intuitive means for organizing and finding files” while also managing metadata (information about your files). When that “map” breaks, Windows no longer knows how to read what’s on it.
The main thing to remember: RAW does NOT mean empty. It means unreadable to the OS. That’s why RAW file recovery is often possible, but your next steps matter a lot.
How to Recover Files from a RAW Drive
Before anything else, let’s get the files off it first. That’s the safer order. If the data on this RAW drive matters, don’t skip this.
We’ll walk through several ways to recover files from a RAW drive. But from our experience, Method 1 is the one that makes sense for most people. It’s the most universal, doesn’t require much technical knowledge, and many users have successfully recovered data from RAW drives this way. For instance, one user on X reported:
Definitely get the DiskDrill software. I have gotten files back from damaged hard drives that even repair shops said they couldn’t fix without sending it to a lab and doing the $10k full physical procedure
— 🔥 METAL Q 🔥 (@Quincinerate) January 31, 2024
Another user on Reddit successfully located nearly 1TB of data from a RAW disk after a partition move operation crashed, demonstrating that recovery is possible even with large amounts of data.
Method 1: Recover Data from a RAW Drive using Disk Drill
When dealing with a RAW drive, your first solution of choice should be data recovery software because attempting to fix or repair the drive before recovering your files could lead to permanent data loss of your valuable data.
Disk Drill is an excellent choice in this regard because of how well it can handle RAW drives, thanks to its ability to bypass the corrupted, unsupported, or missing file system and scan the drive’s contents directly to locate and restore your files based on their signatures (around 400 unique signatures are supported by the software) and file system metadata from remnant partitions.
But if the disk behaves strangely – slow scans, freezes, makes strange sounds, disconnects, or gives bad-sector warnings – treat it more carefully. Disk Drill lets you check the drive’s S.M.A.R.T. status and, if the health indicators show warnings, create a byte-to-byte copy of the RAW drive before recovery, which helps reduce stress on the original disk. You can read how to do that in our byte-to-byte backup images in Disk Drill’s backup guide.
Here is how to recover data from a RAW drive:
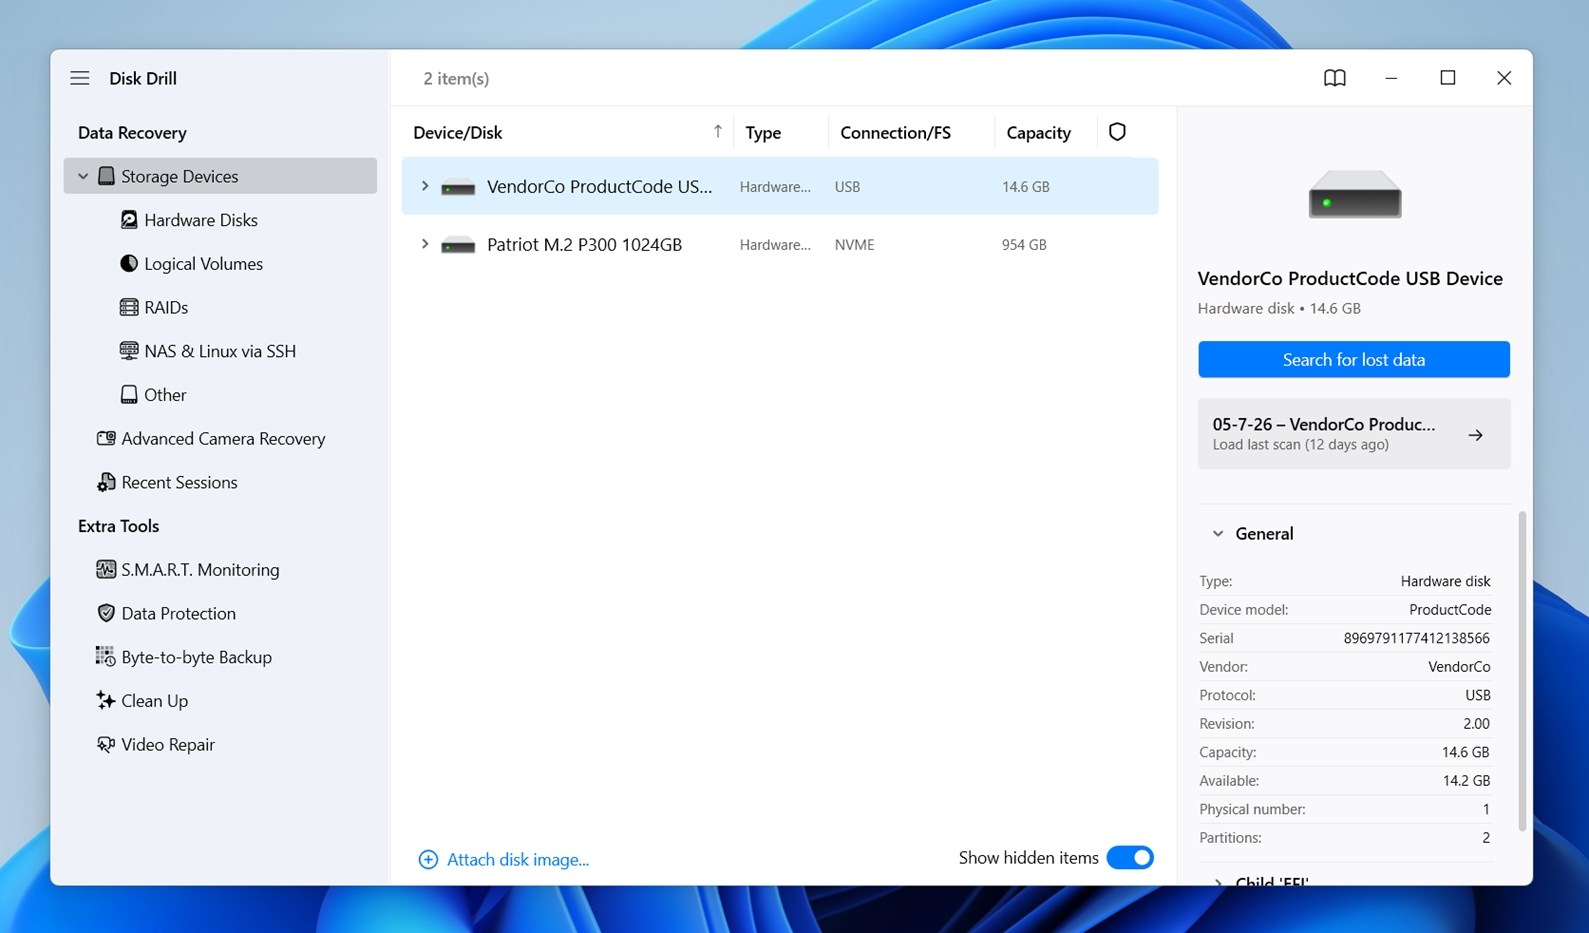
- Download, install, and launch Disk Drill for Windows.
- Select the RAW storage device on which the files were stored. (If Disk Drill shows both the whole device and a RAW partition on it, select the entire device for the best results).
- Click Search for lost data.
- Choose the scan type when Disk Drill asks. In most RAW drive cases, Universal Scan is the best option.
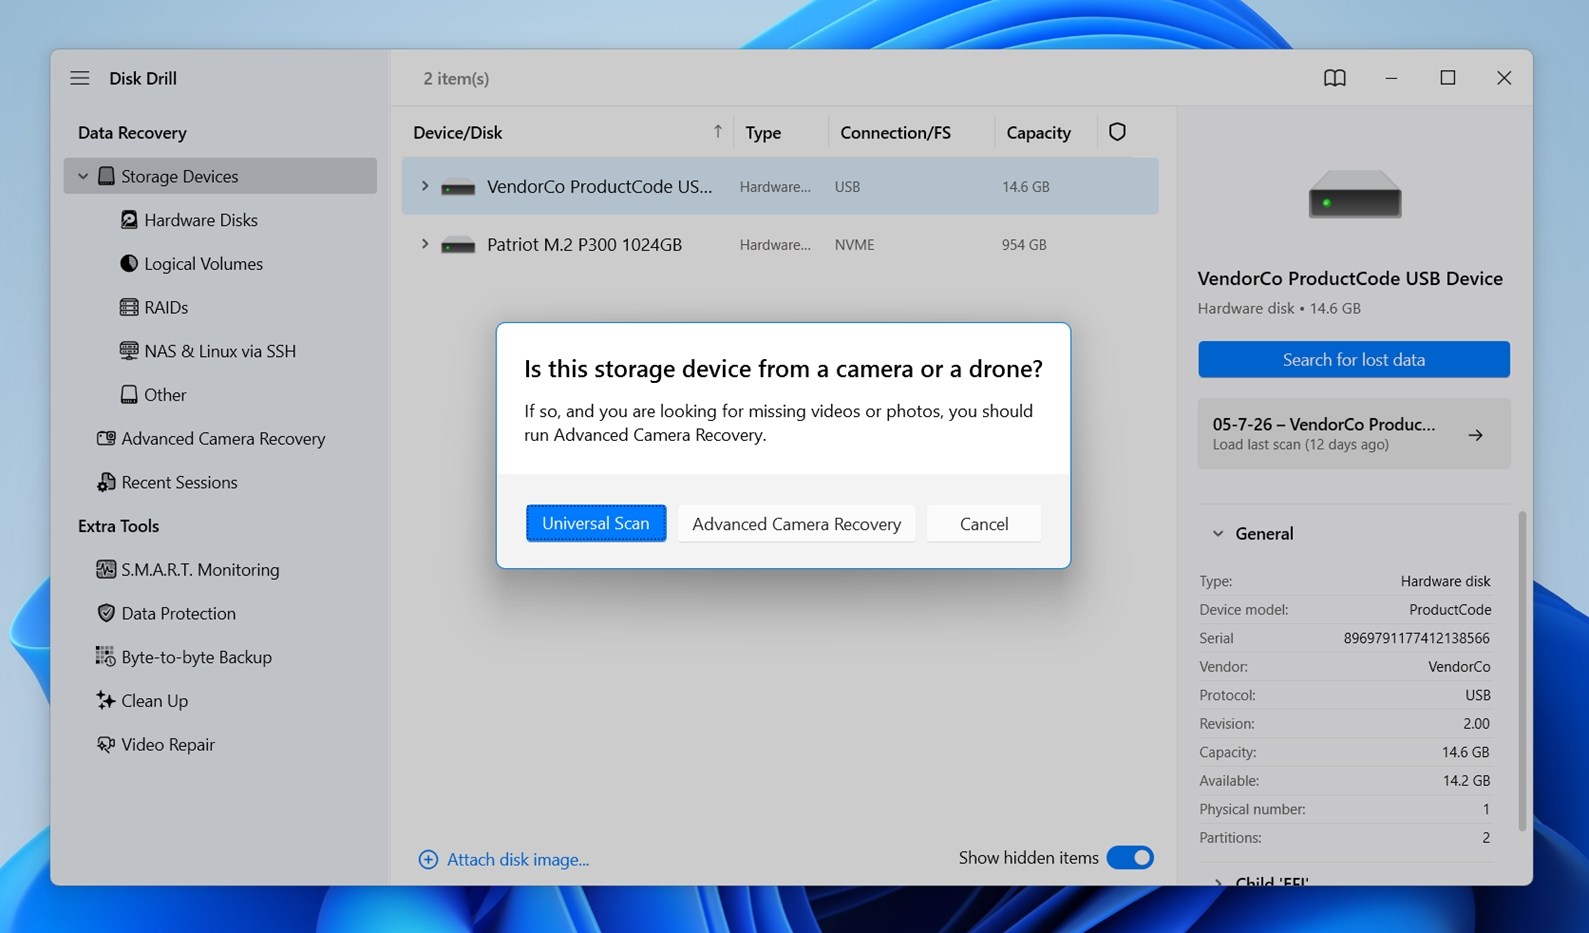 It’s called universal for a reason: Disk Drill can look for existing file system records and file signatures in one scan, which gives you the best shot without overthinking the settings.
 - Wait for the scan to finish or click Review found items to see found files right away (Disk Drill will continue scanning in the background).
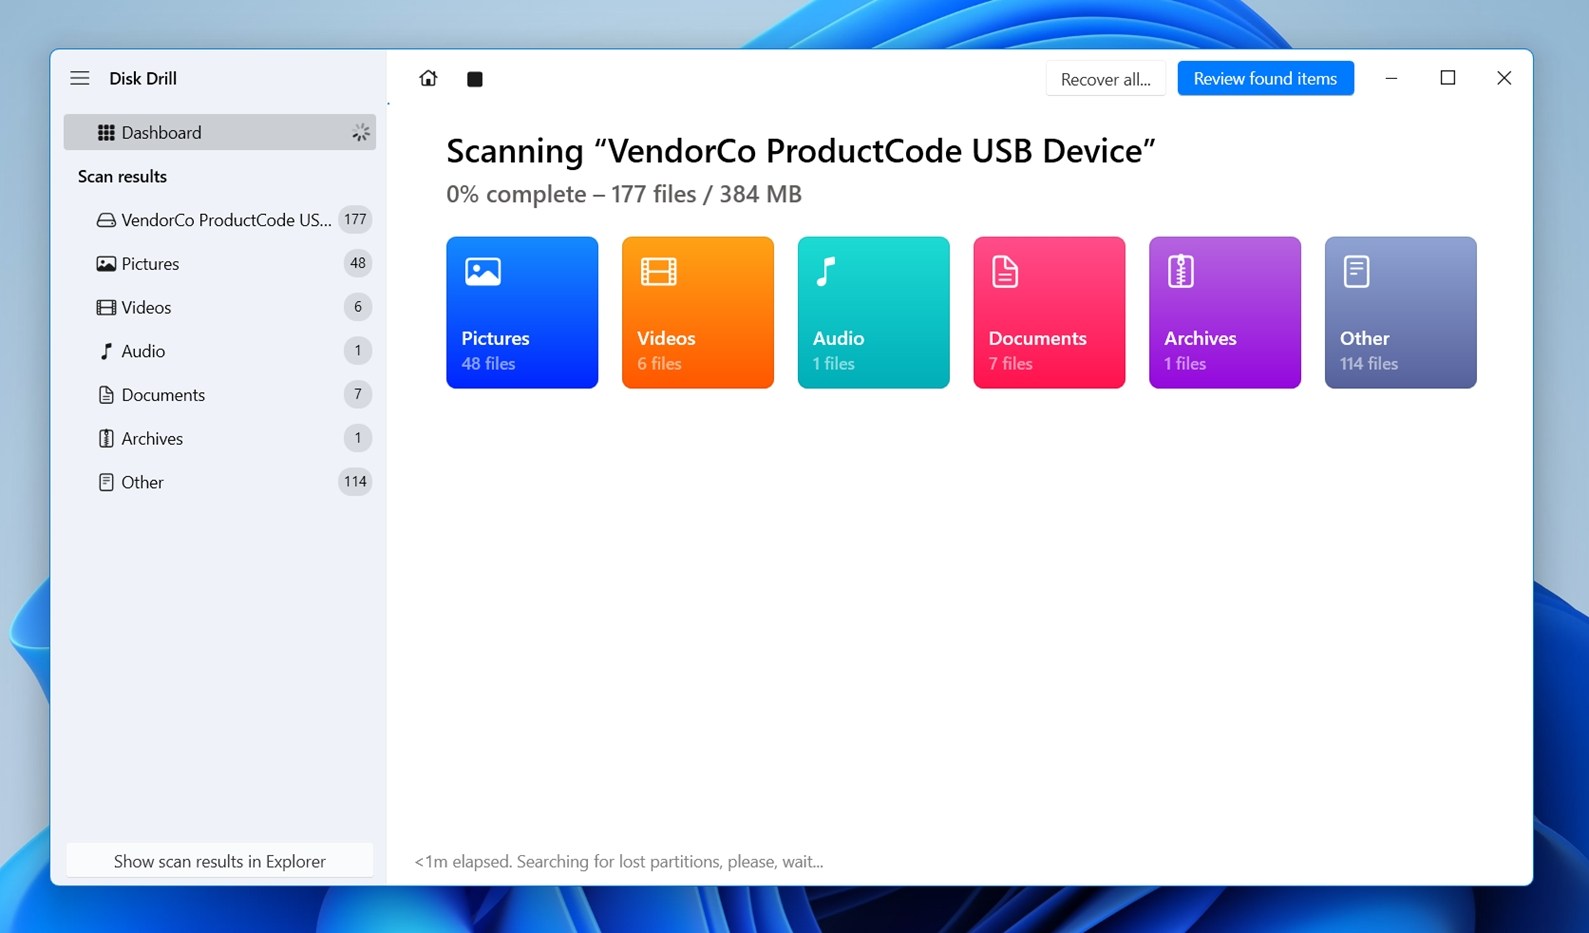
- Use the file format filters on the left to narrow down the scan results until you find the file you’re looking for.
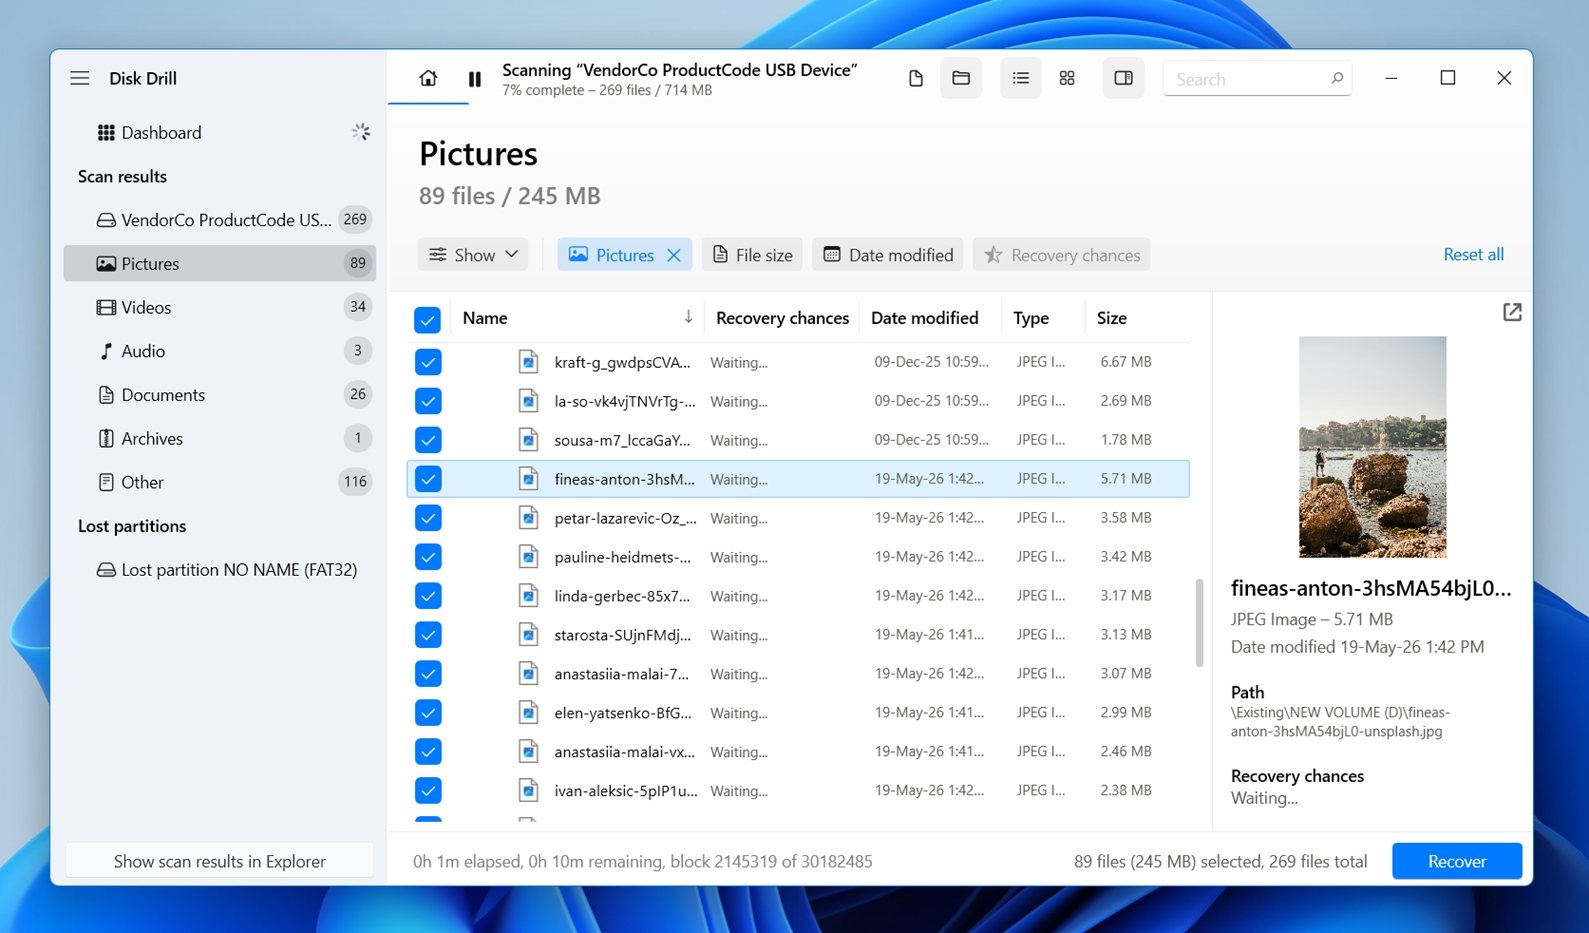
- Select it to see its preview on the right. In RAW recovery cases, Disk Drill can often detect the previous file system and reconstruct folders, file names, dates, and other metadata. But sometimes that metadata is missing, and previews become one of the easiest ways to understand what Disk Drill found.
If a file opens in preview, it’s a strong sign it will recover intact. But if there’s no preview, don’t write it off – some formats won’t preview without the right Windows viewer/codec, so recover any file that still looks relevant and check it later in the proper app. - Click the checkbox next to the file and click the blue Recover button at the bottom.
- Specify the recovery folder and click Next.
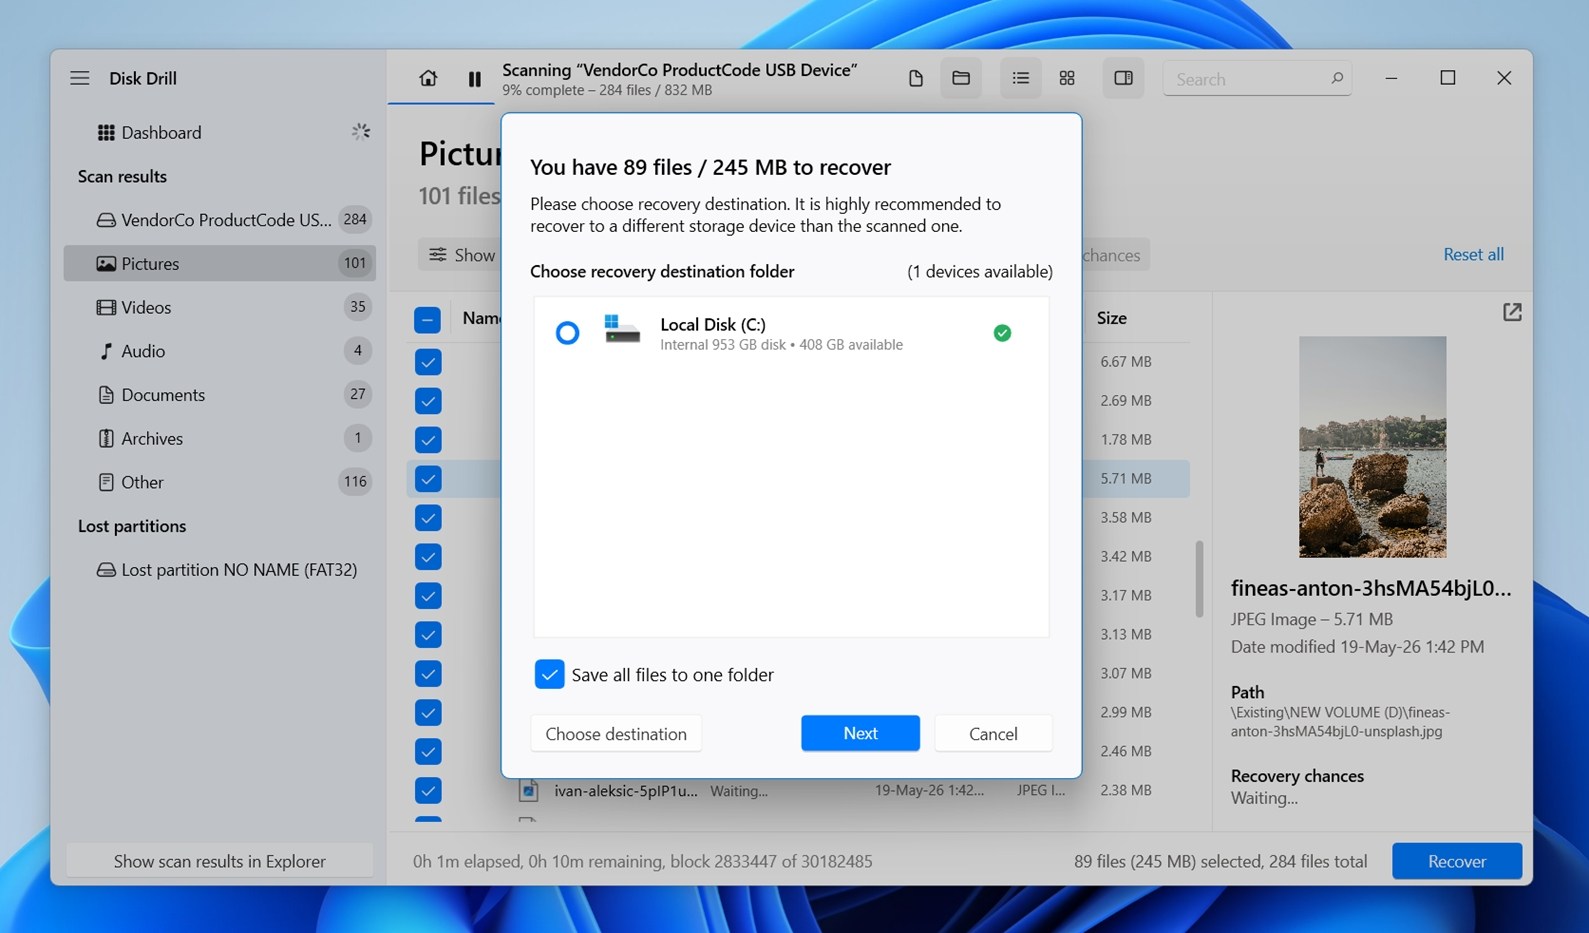 Once recovery finishes, Disk Drill will offer to open the destination folder. Open it and check the recovered files right away.
As you can see, all it takes is a few simple steps to recover inaccessible data from a RAW drive using Disk Drill. On Windows, you can preview unlimited files and restore up to 100 MB at no charge. That may be enough to save the most important documents. And if you need to recover more, the scan and preview features still let you confirm that your files are there and recoverable before you decide what to do next.
Note: Disk Drill has another tool that can be useful after RAW drive recovery: S.M.A.R.T. monitoring. Once you recover your files, open Disk Drill’s S.M.A.R.T. section and turn monitoring on. It can show you the drive’s health status, temperature, power-on hours, any warning signs.
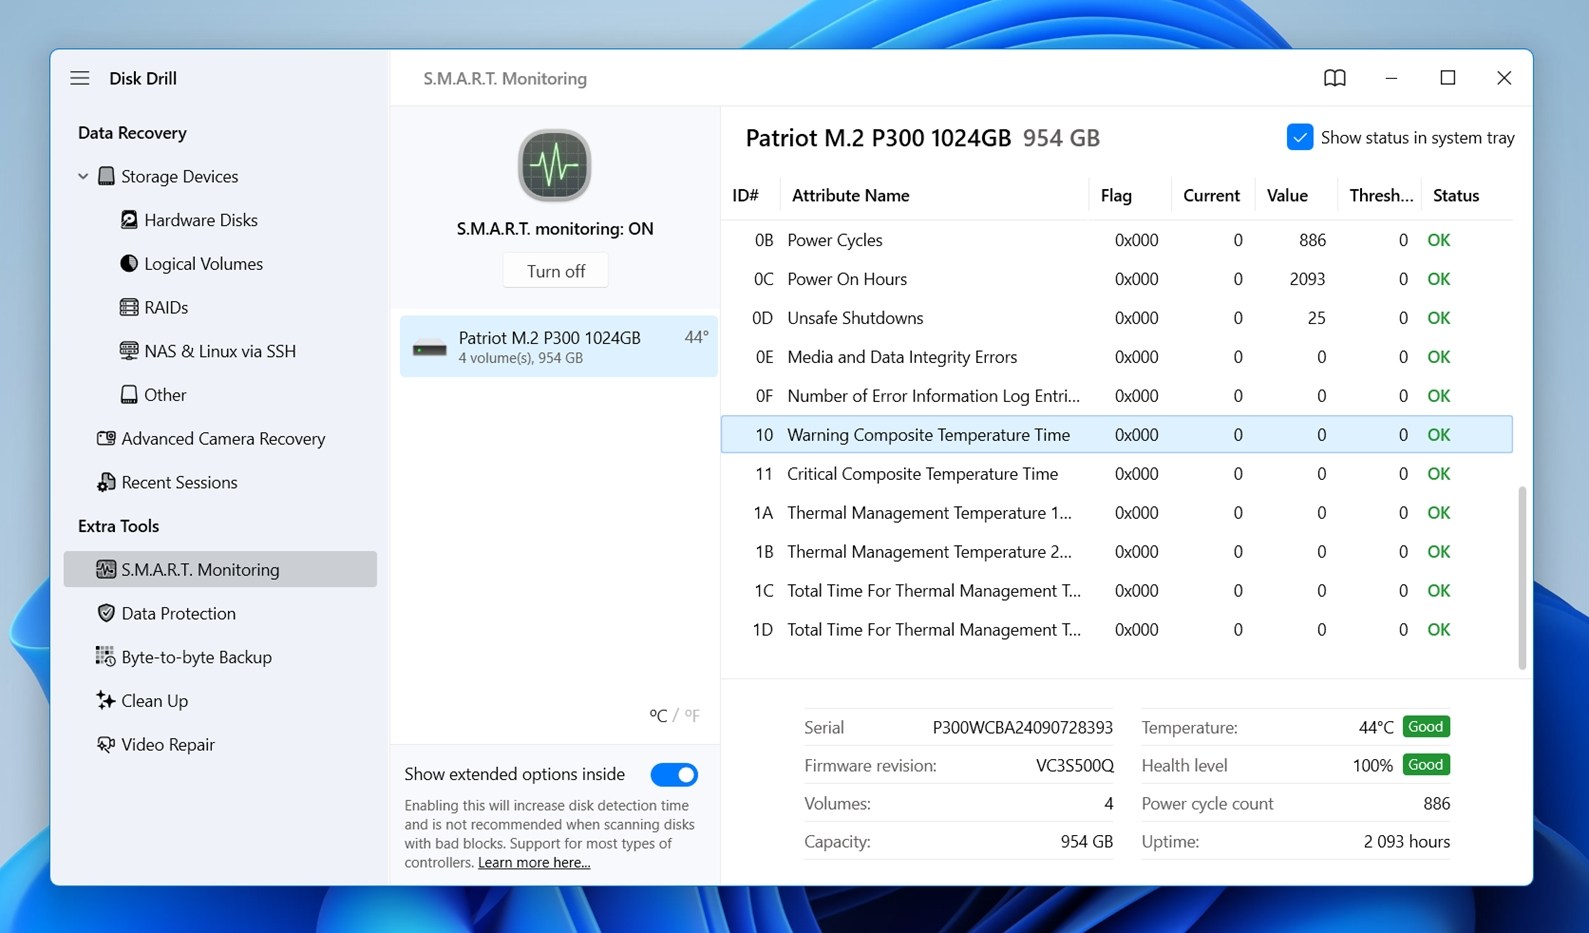
This is useful because a drive that became RAW once may still be fine, especially if the issue was only logical. But if S.M.A.R.T. shows warnings, or the drive keeps acting slow, or becomes RAW again, don’t trust it with important files anymore.
Method 2: Restore RAW Drive Data with TestDisk
The second method is TestDisk. It is a free and open-source data recovery utility whose purpose is to recover lost partitions.
It’s not as universal or beginner-friendly as the previous method, but it can work well when the RAW issue comes from a damaged/missing partition structure, for instance, a Redditor was able to recover their entire 3TB Plex library after it became RAW.
If you’re not afraid of the command line, then you can follow our detailed guide on how to repair a RAW drive with TestDisk:
- Download TestDisk, extract the files, and run TestDisk with administrator privileges.
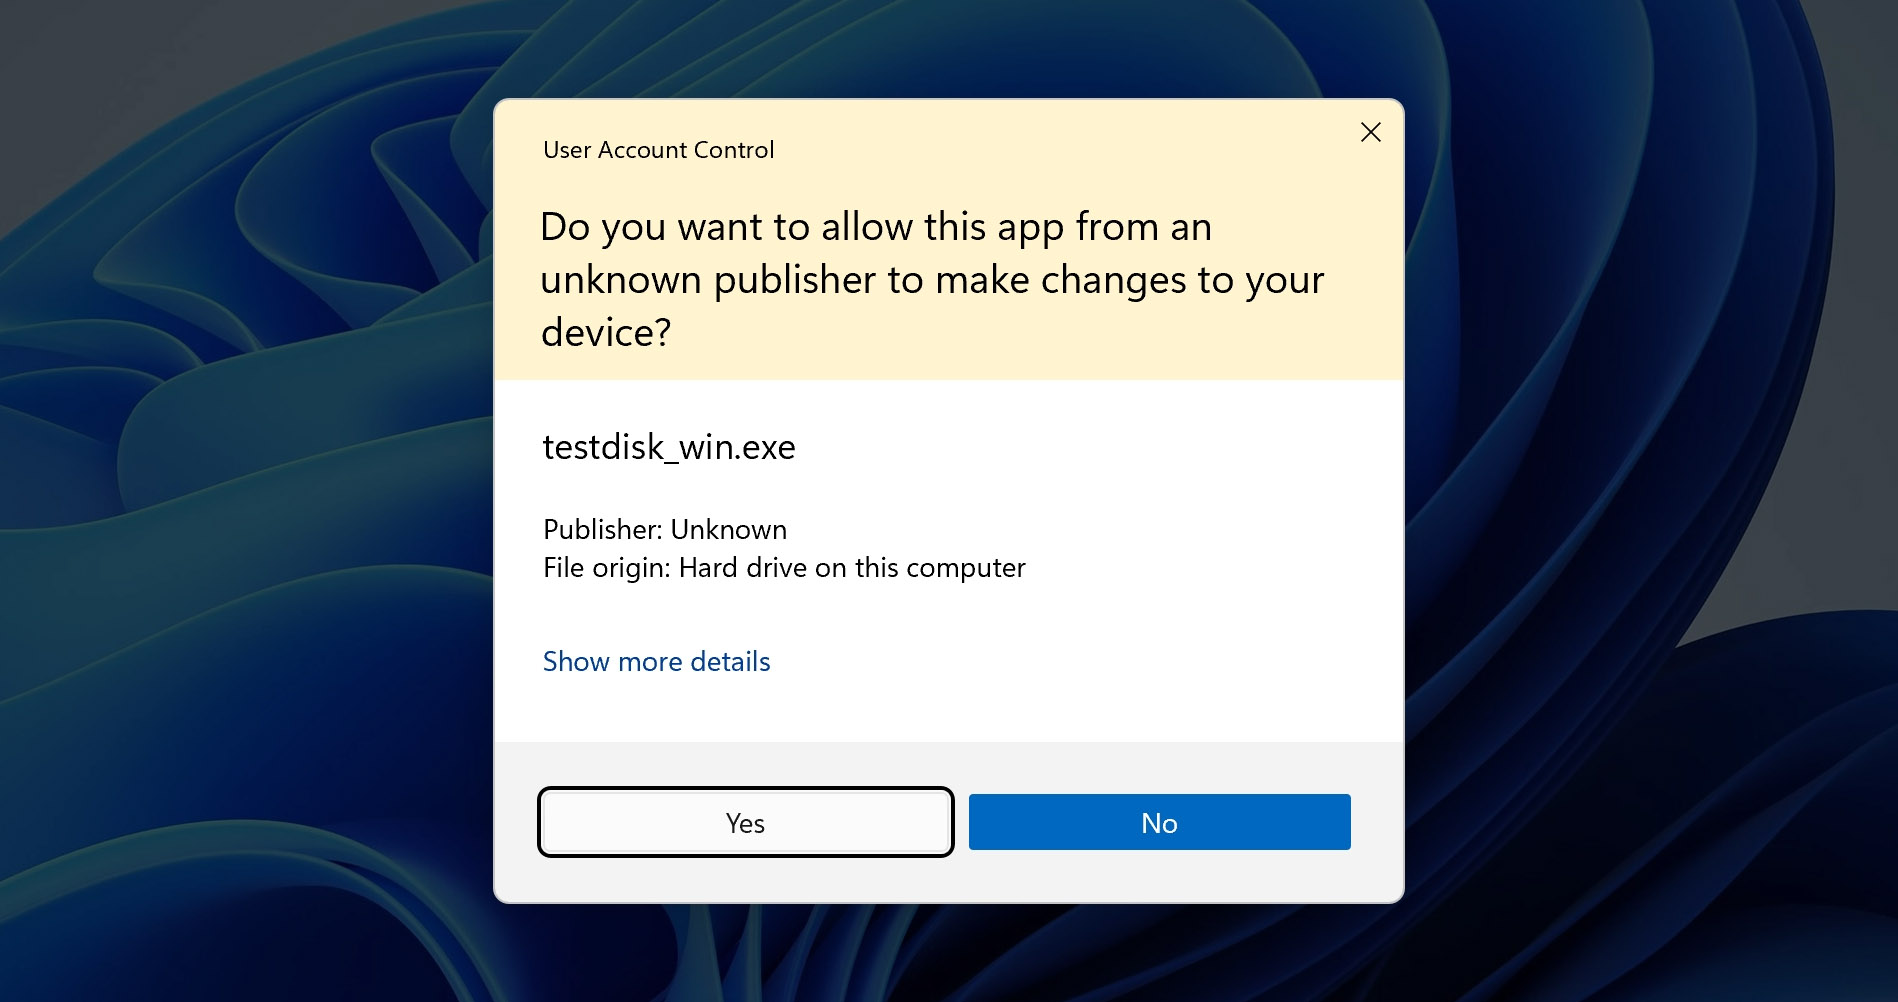
- Select your RAW drive from the list of detected storage devices and press Enter.
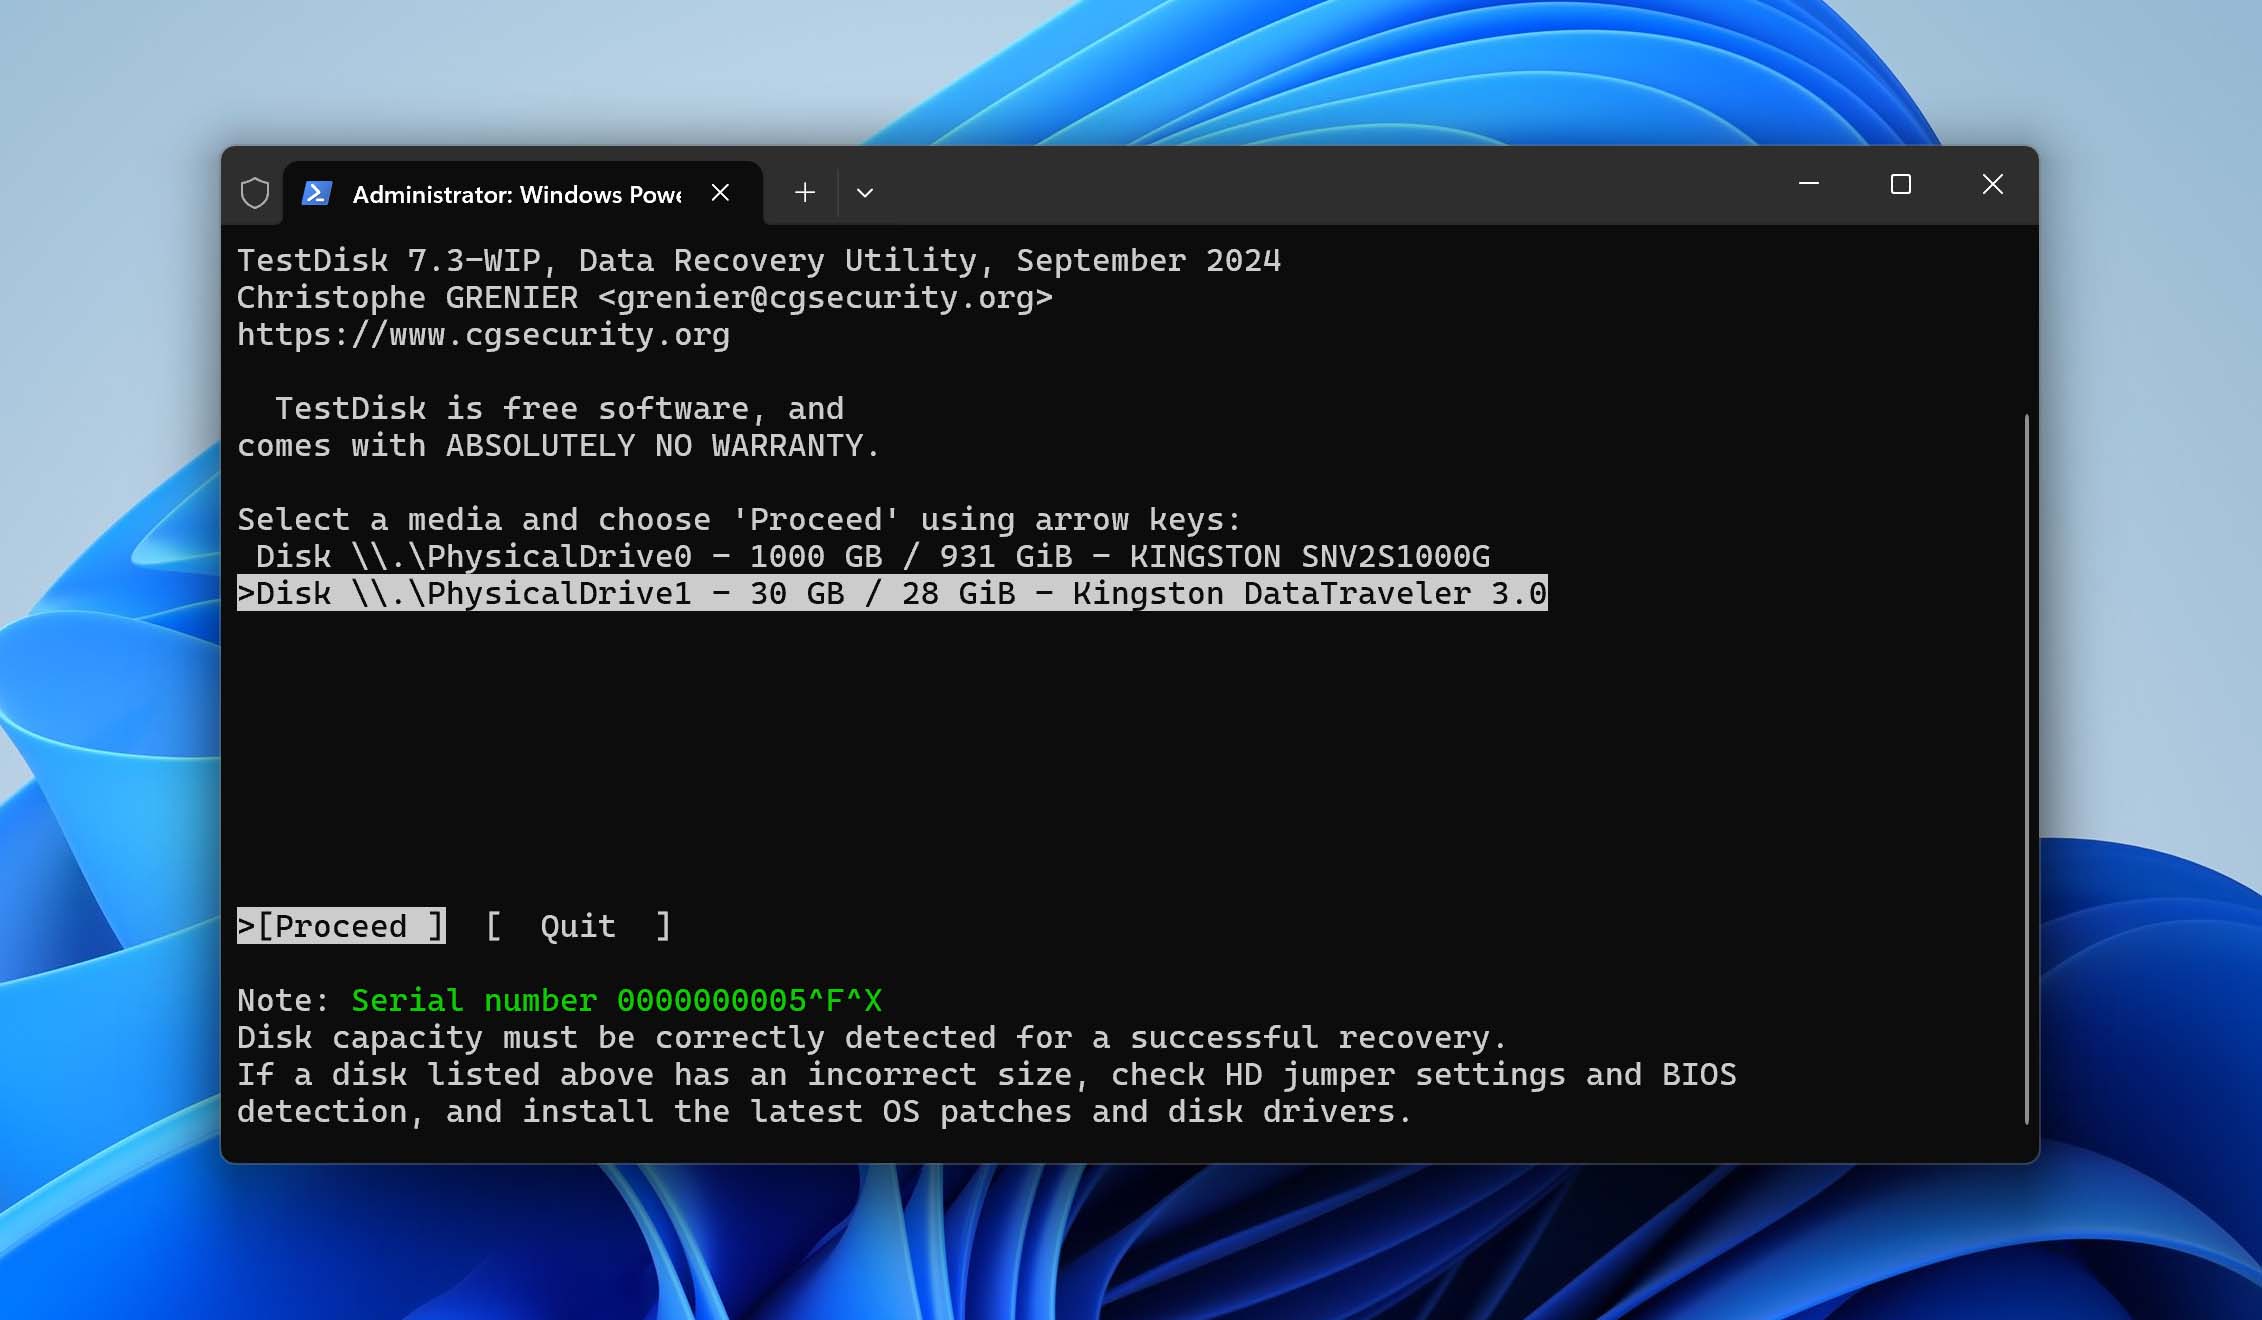
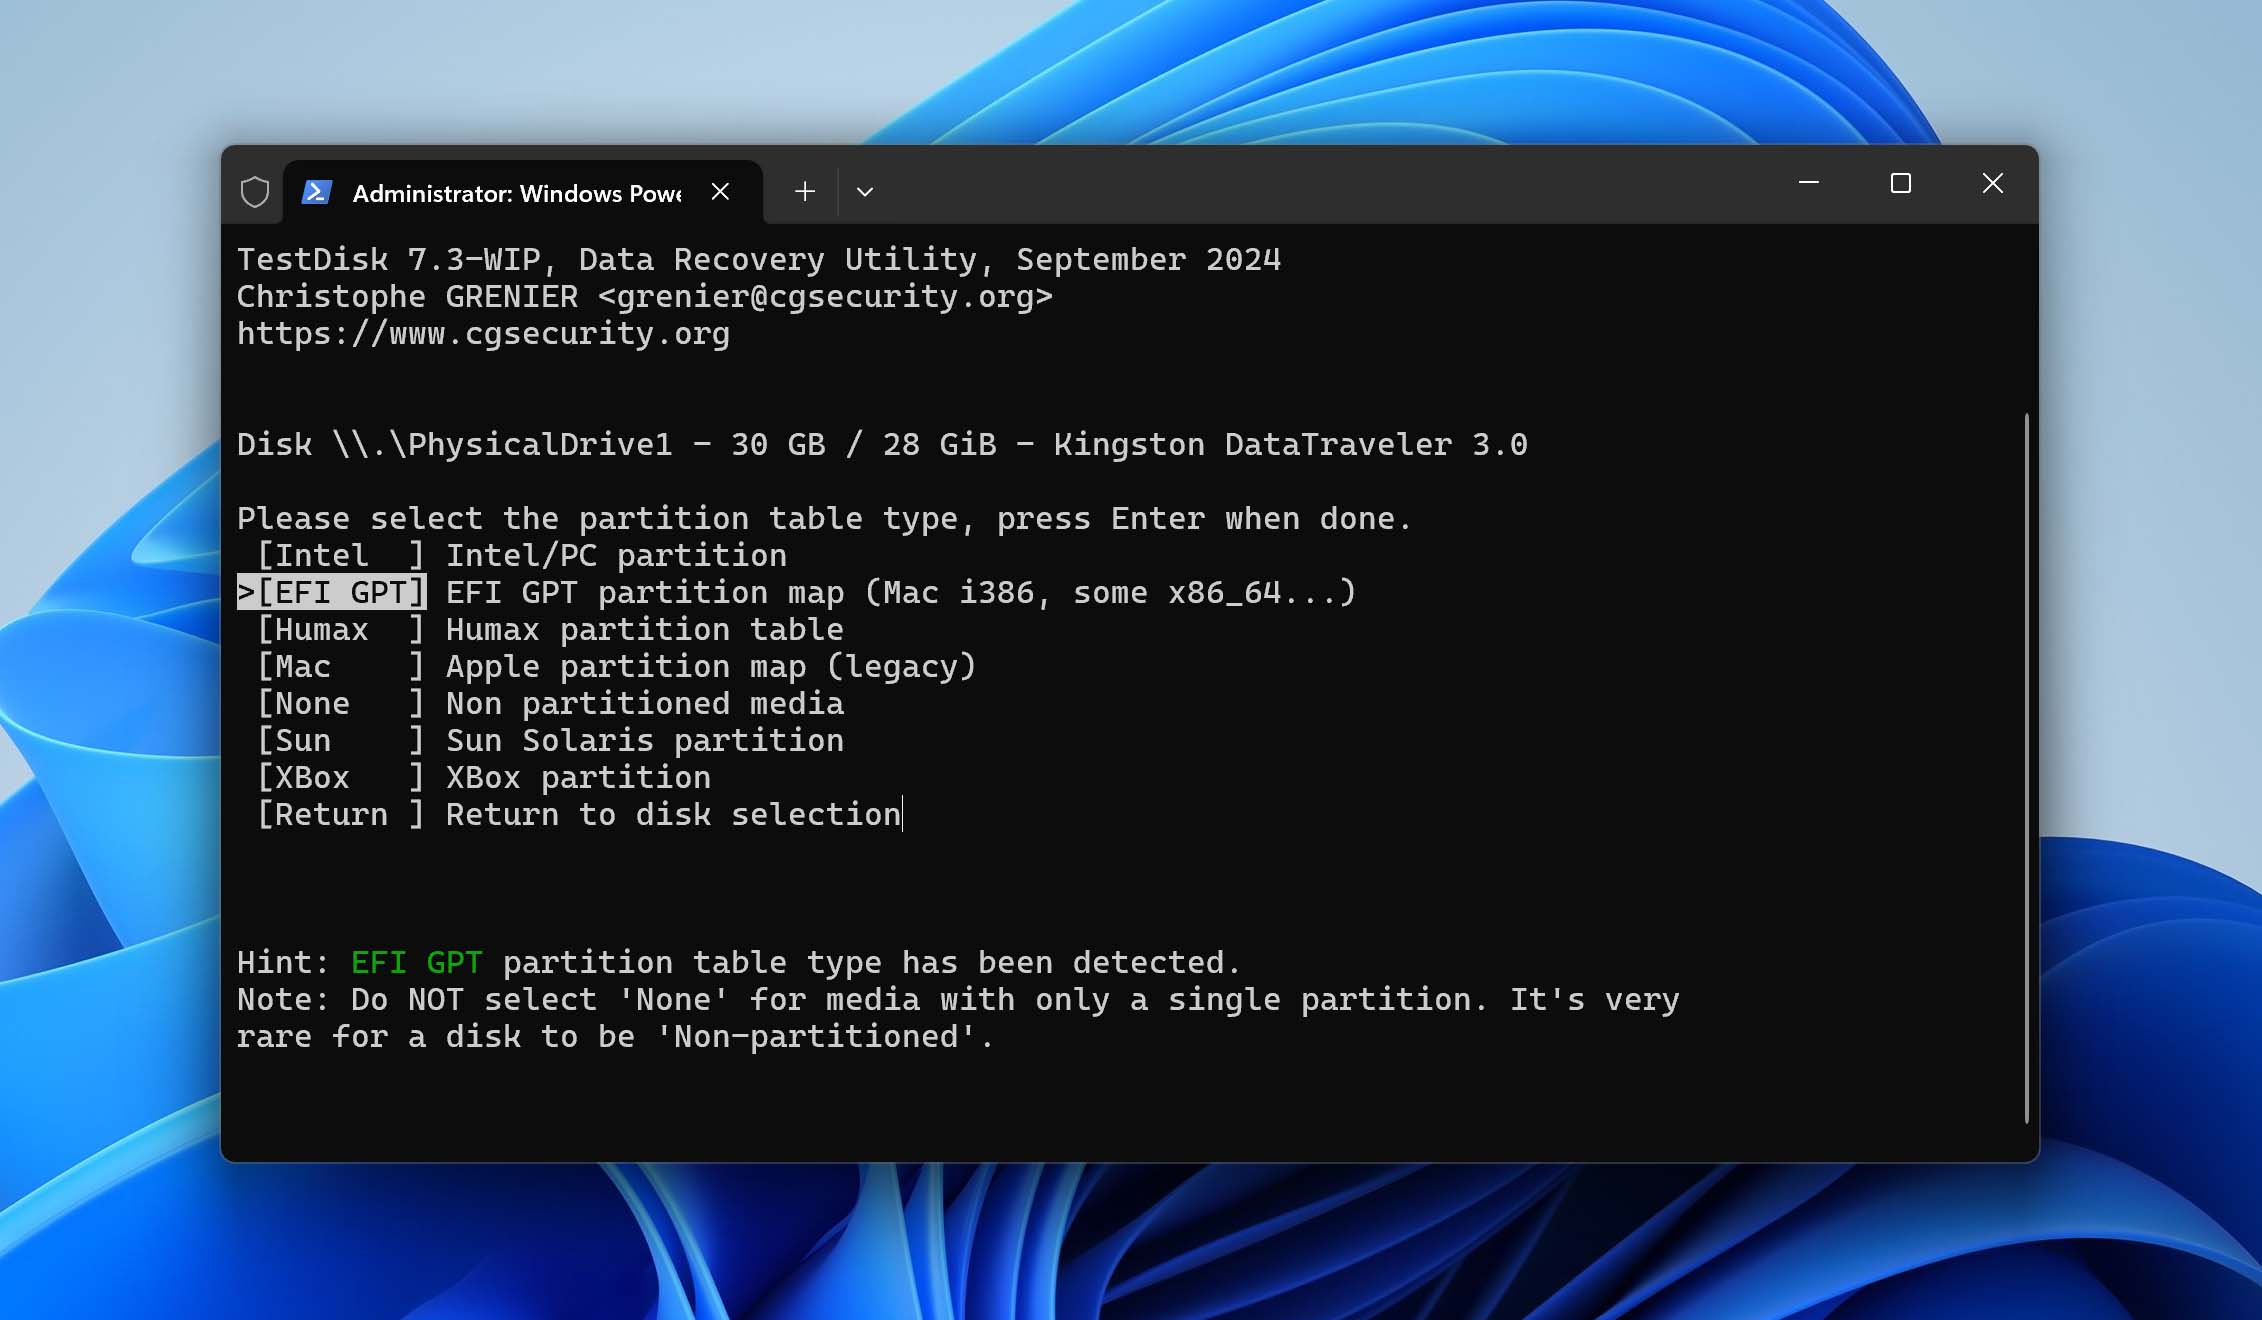
- Choose your partition table type (TestDisk usually auto-detects this correctly).
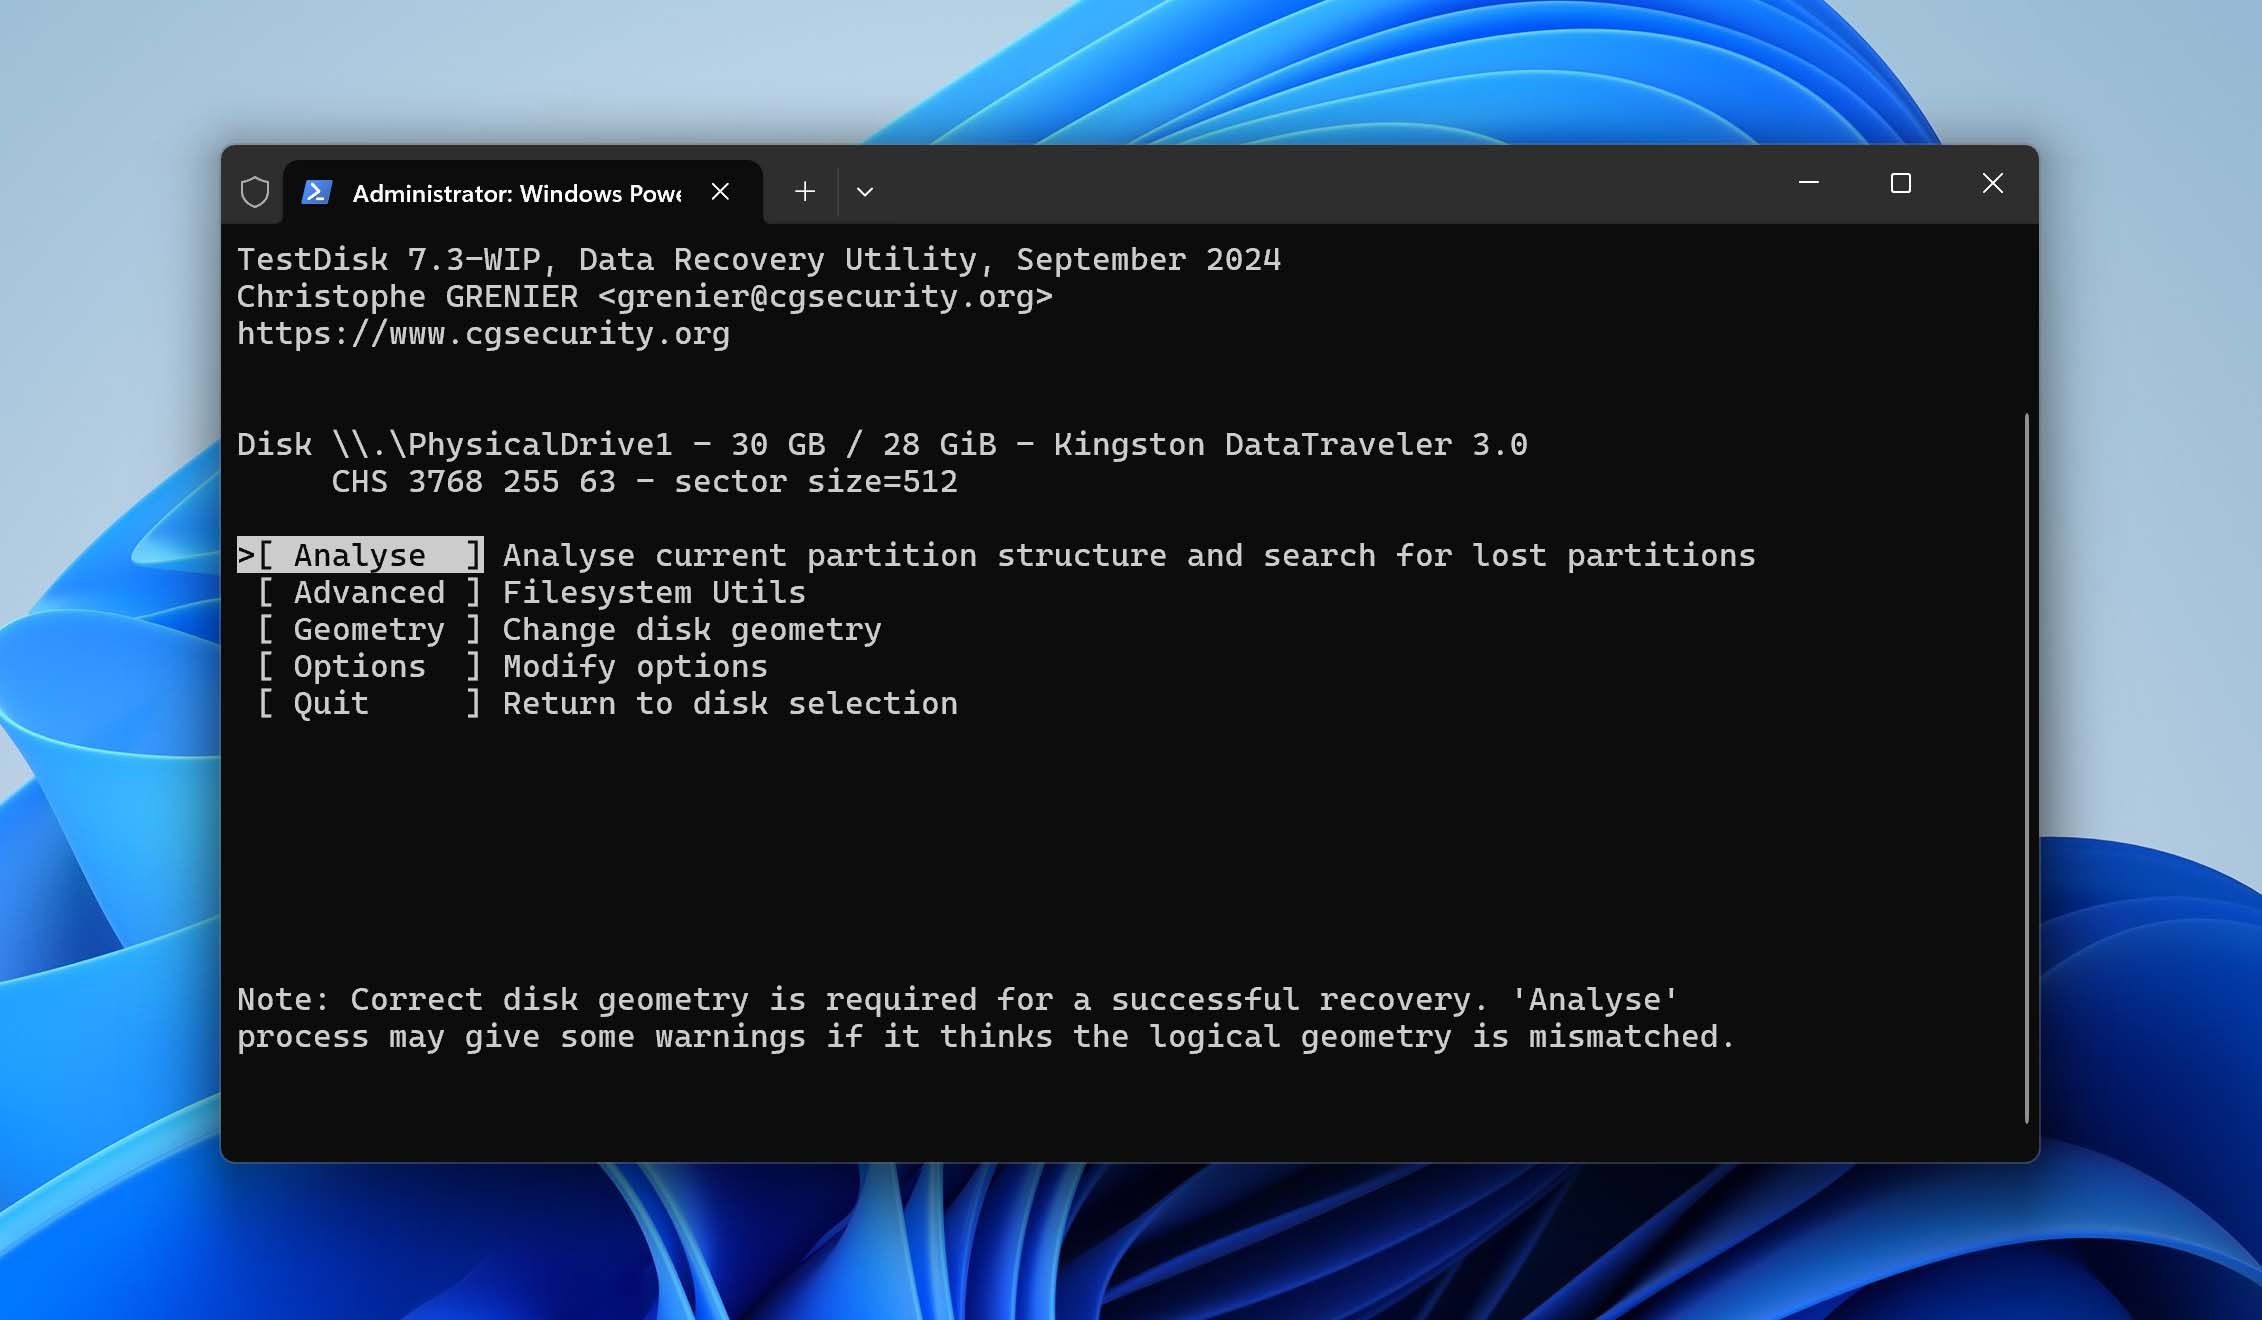
- Select Analyze from the main menu to examine the current partition structure.
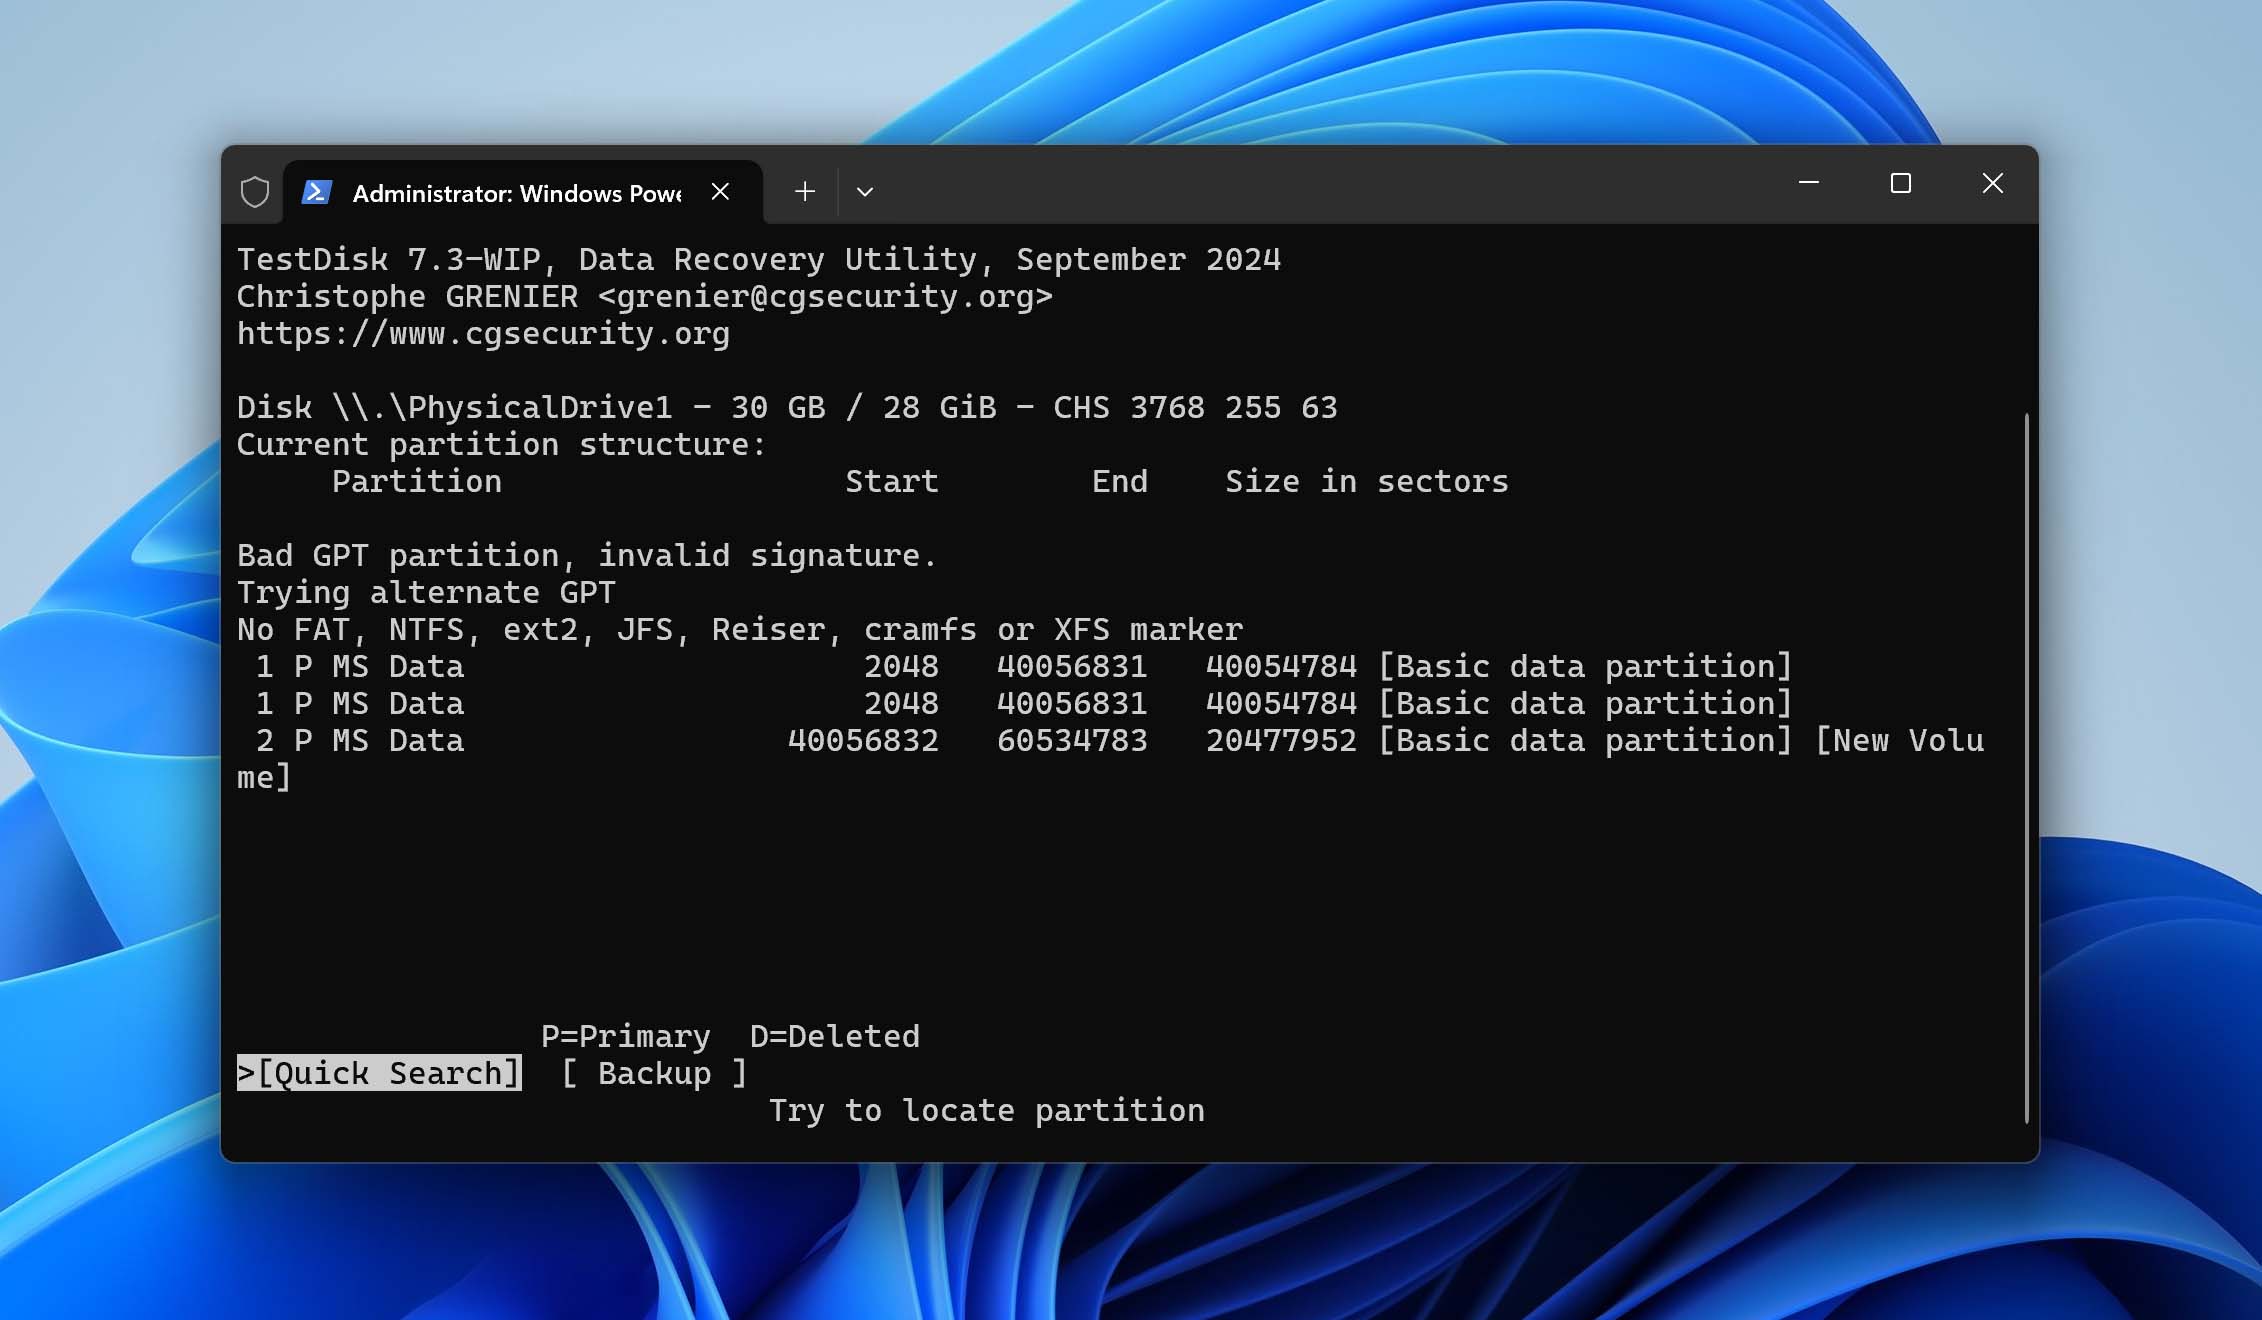
- Run Quick Search first to scan for lost partitions using partition table data. If Quick Search doesn’t find your partition or shows incorrect results, use Deeper Search for a more thorough scan. This mode will look for file system signatures and backup boot sectors.
- Once TestDisk finds your partitions, you can press p to preview the files in each detected partition to verify it’s the correct one, use left/right arrow keys to change a partition’s status (set it to Primary or Logical as appropriate), and press Enter to confirm your selections.
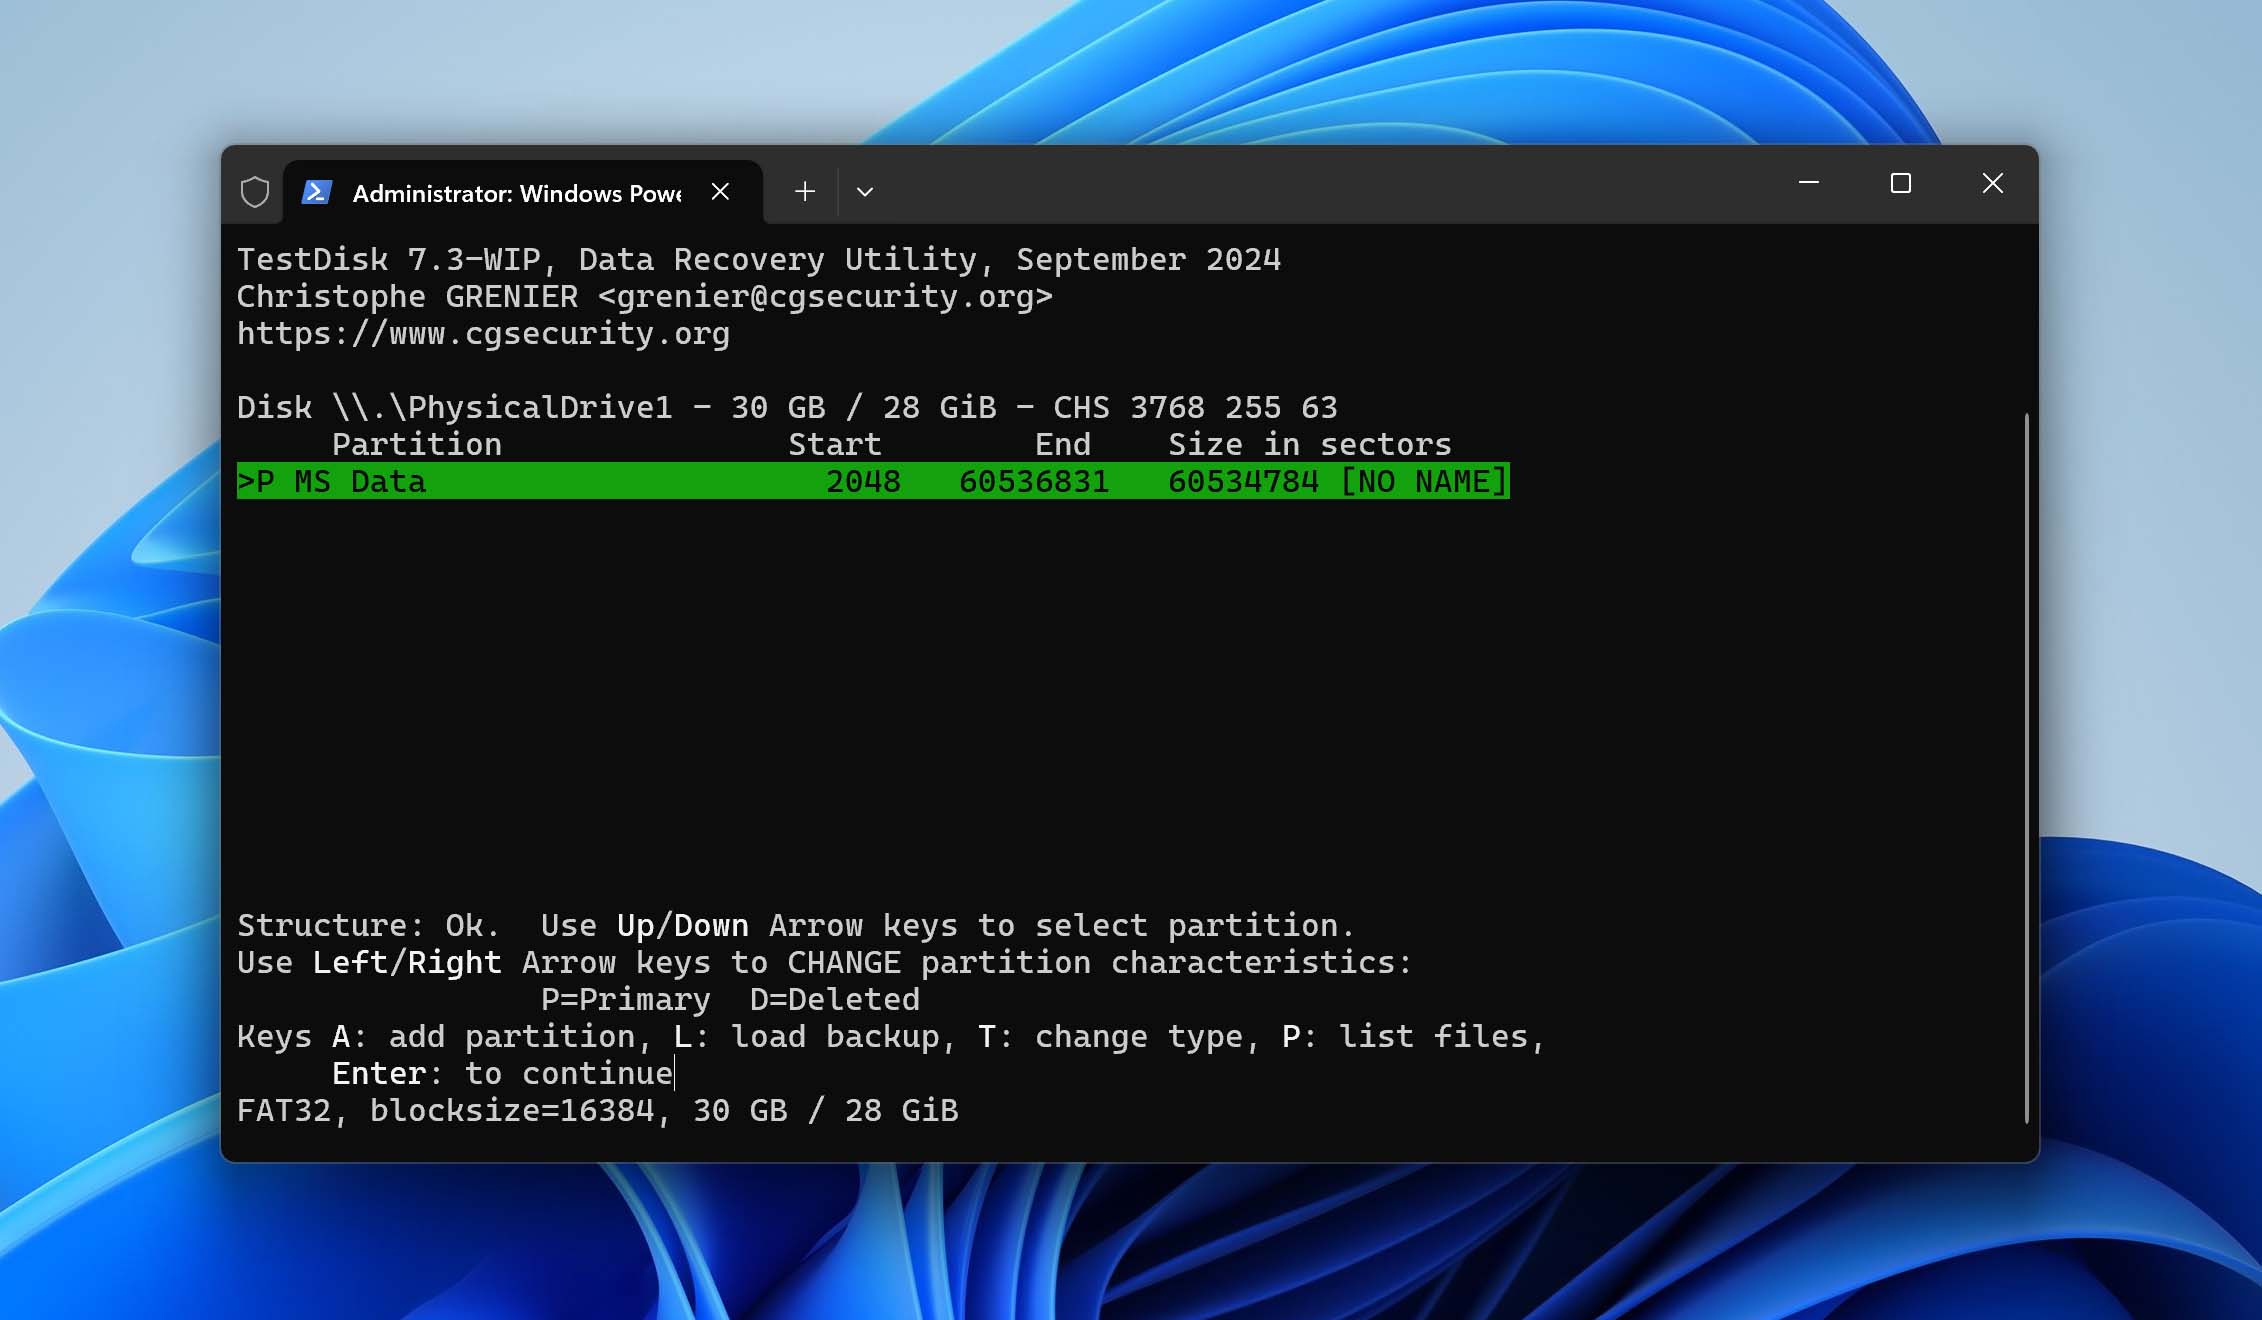
- When you’ve verified the correct partitions are selected, choose Write to save the new partition structure.
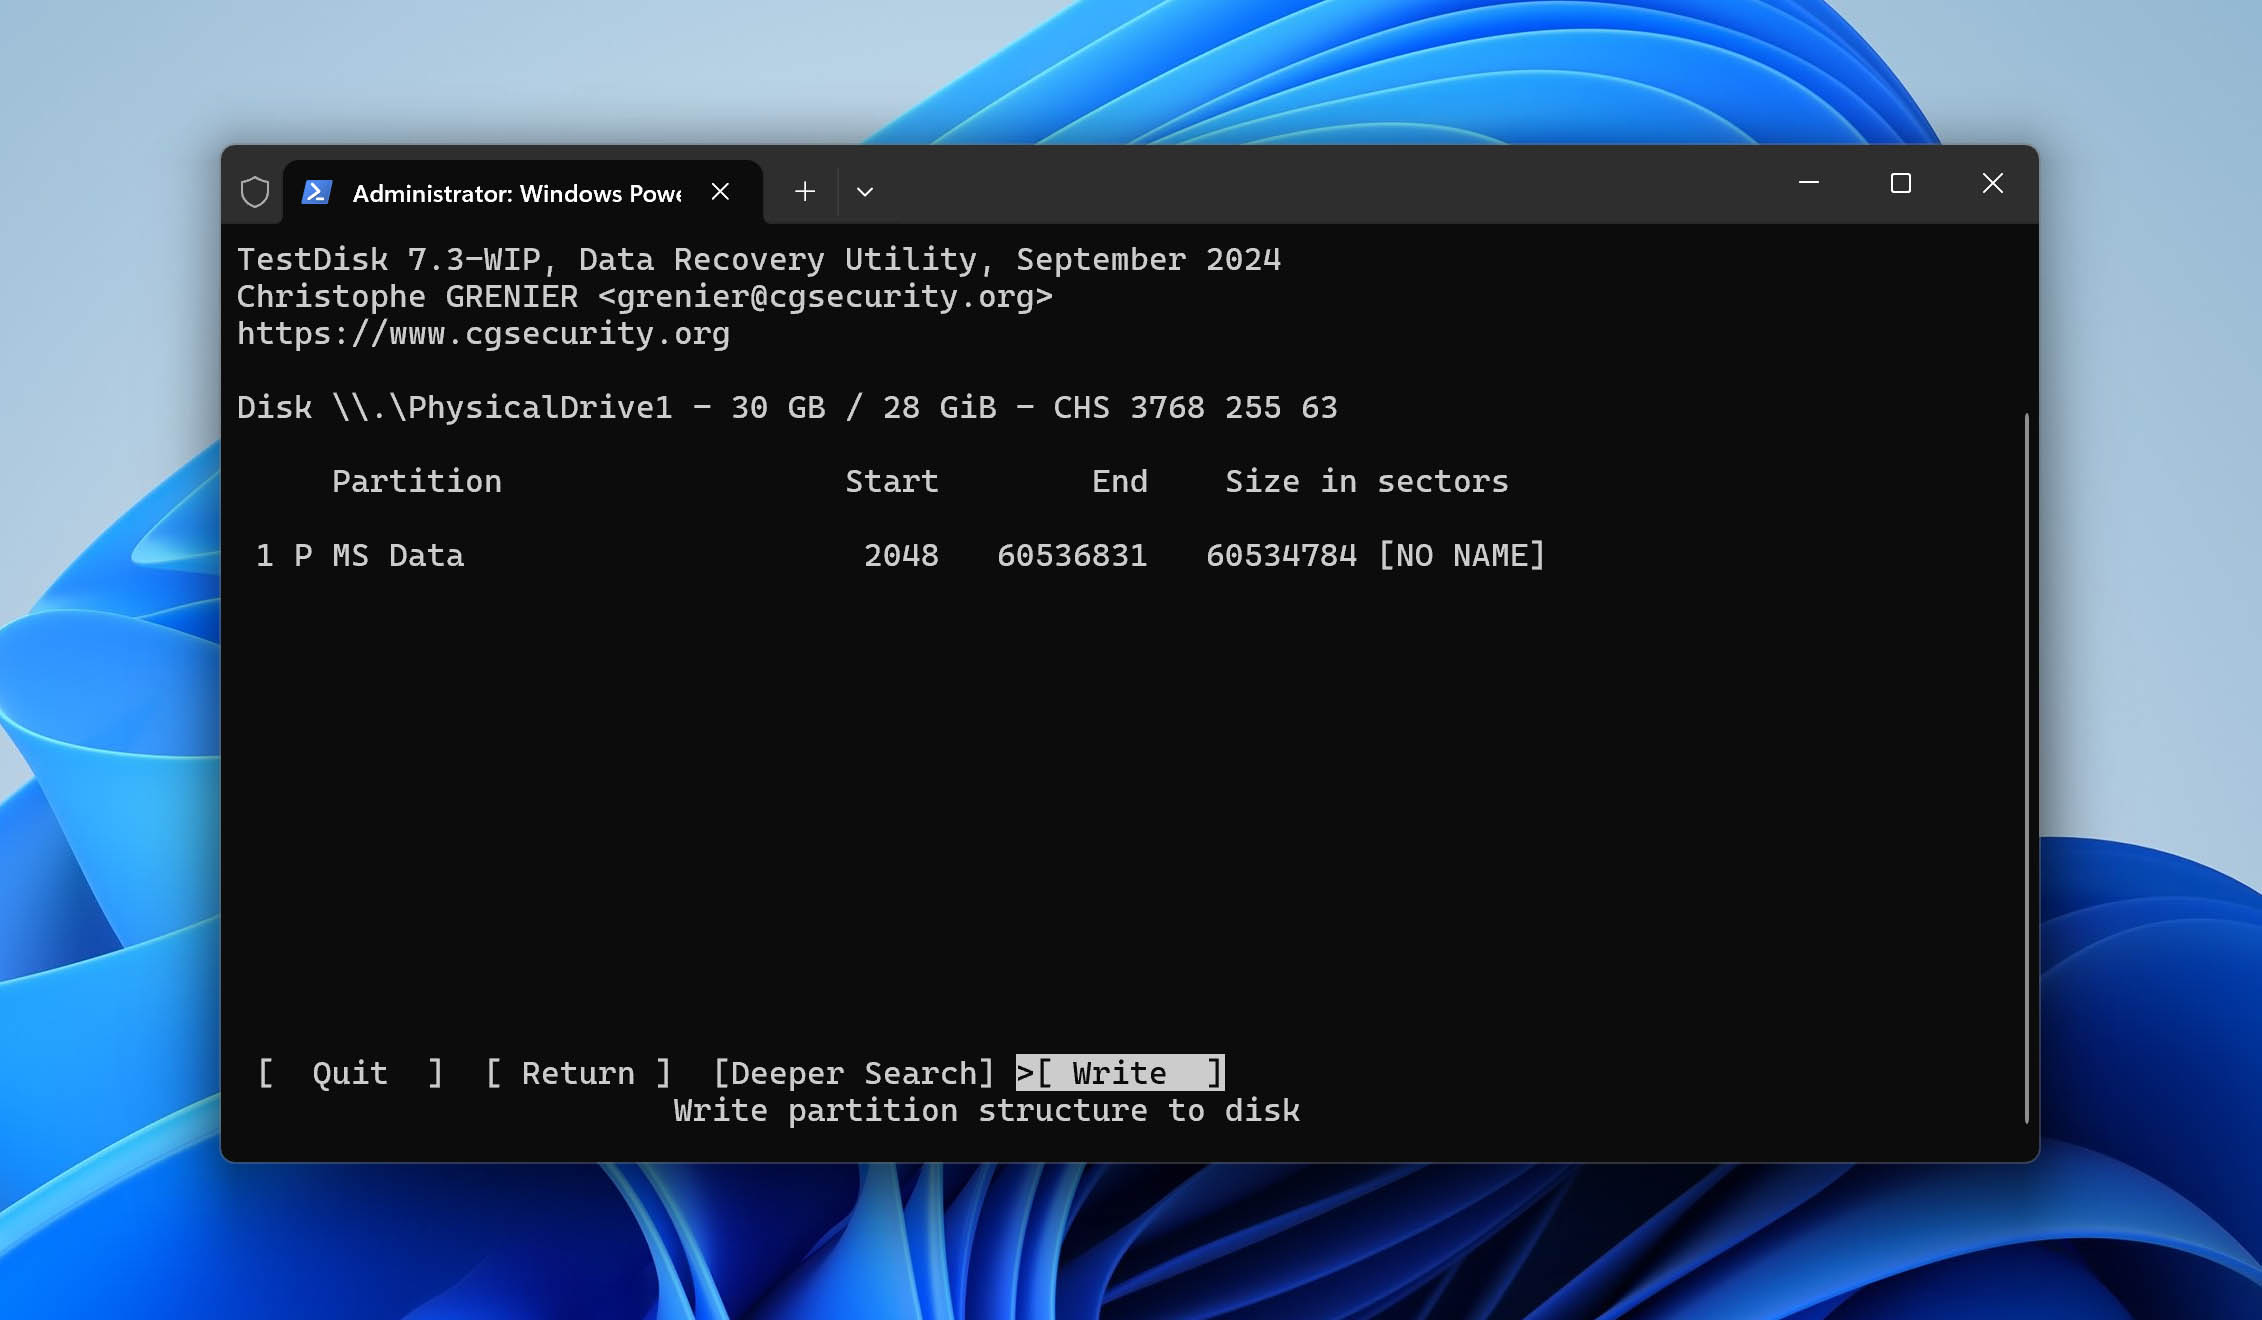
Finally, restart your computer to apply the changes. You should then be able to access the recovered partition from File Explorer.
Method 3: Recover Files from Backups
The last RAW hard drive recovery method is also the least universal one: backups.
We include it at the end because it depends entirely on whether you had a backup running before the drive became RAW. If you did, great, this may be the easiest path. If you didn’t, this method won’t find files from the RAW drive itself.
For this example, we’ll use File History, the built-in Windows backup feature. It can automatically save copies of files from common folders like Desktop, Documents, Pictures, Music, Videos, and Downloads. (It can also back up other folders if you added them manually before the problem happened.)
Again, this method only helps if File History was already turned on and included the files/folders you now need to restore. If that’s the case, here’s how it can be used to restore data after a RAW hard drive incident:
- Open the Start menu and type “Restore your files with File History.”
- Click on the corresponding control panel item.
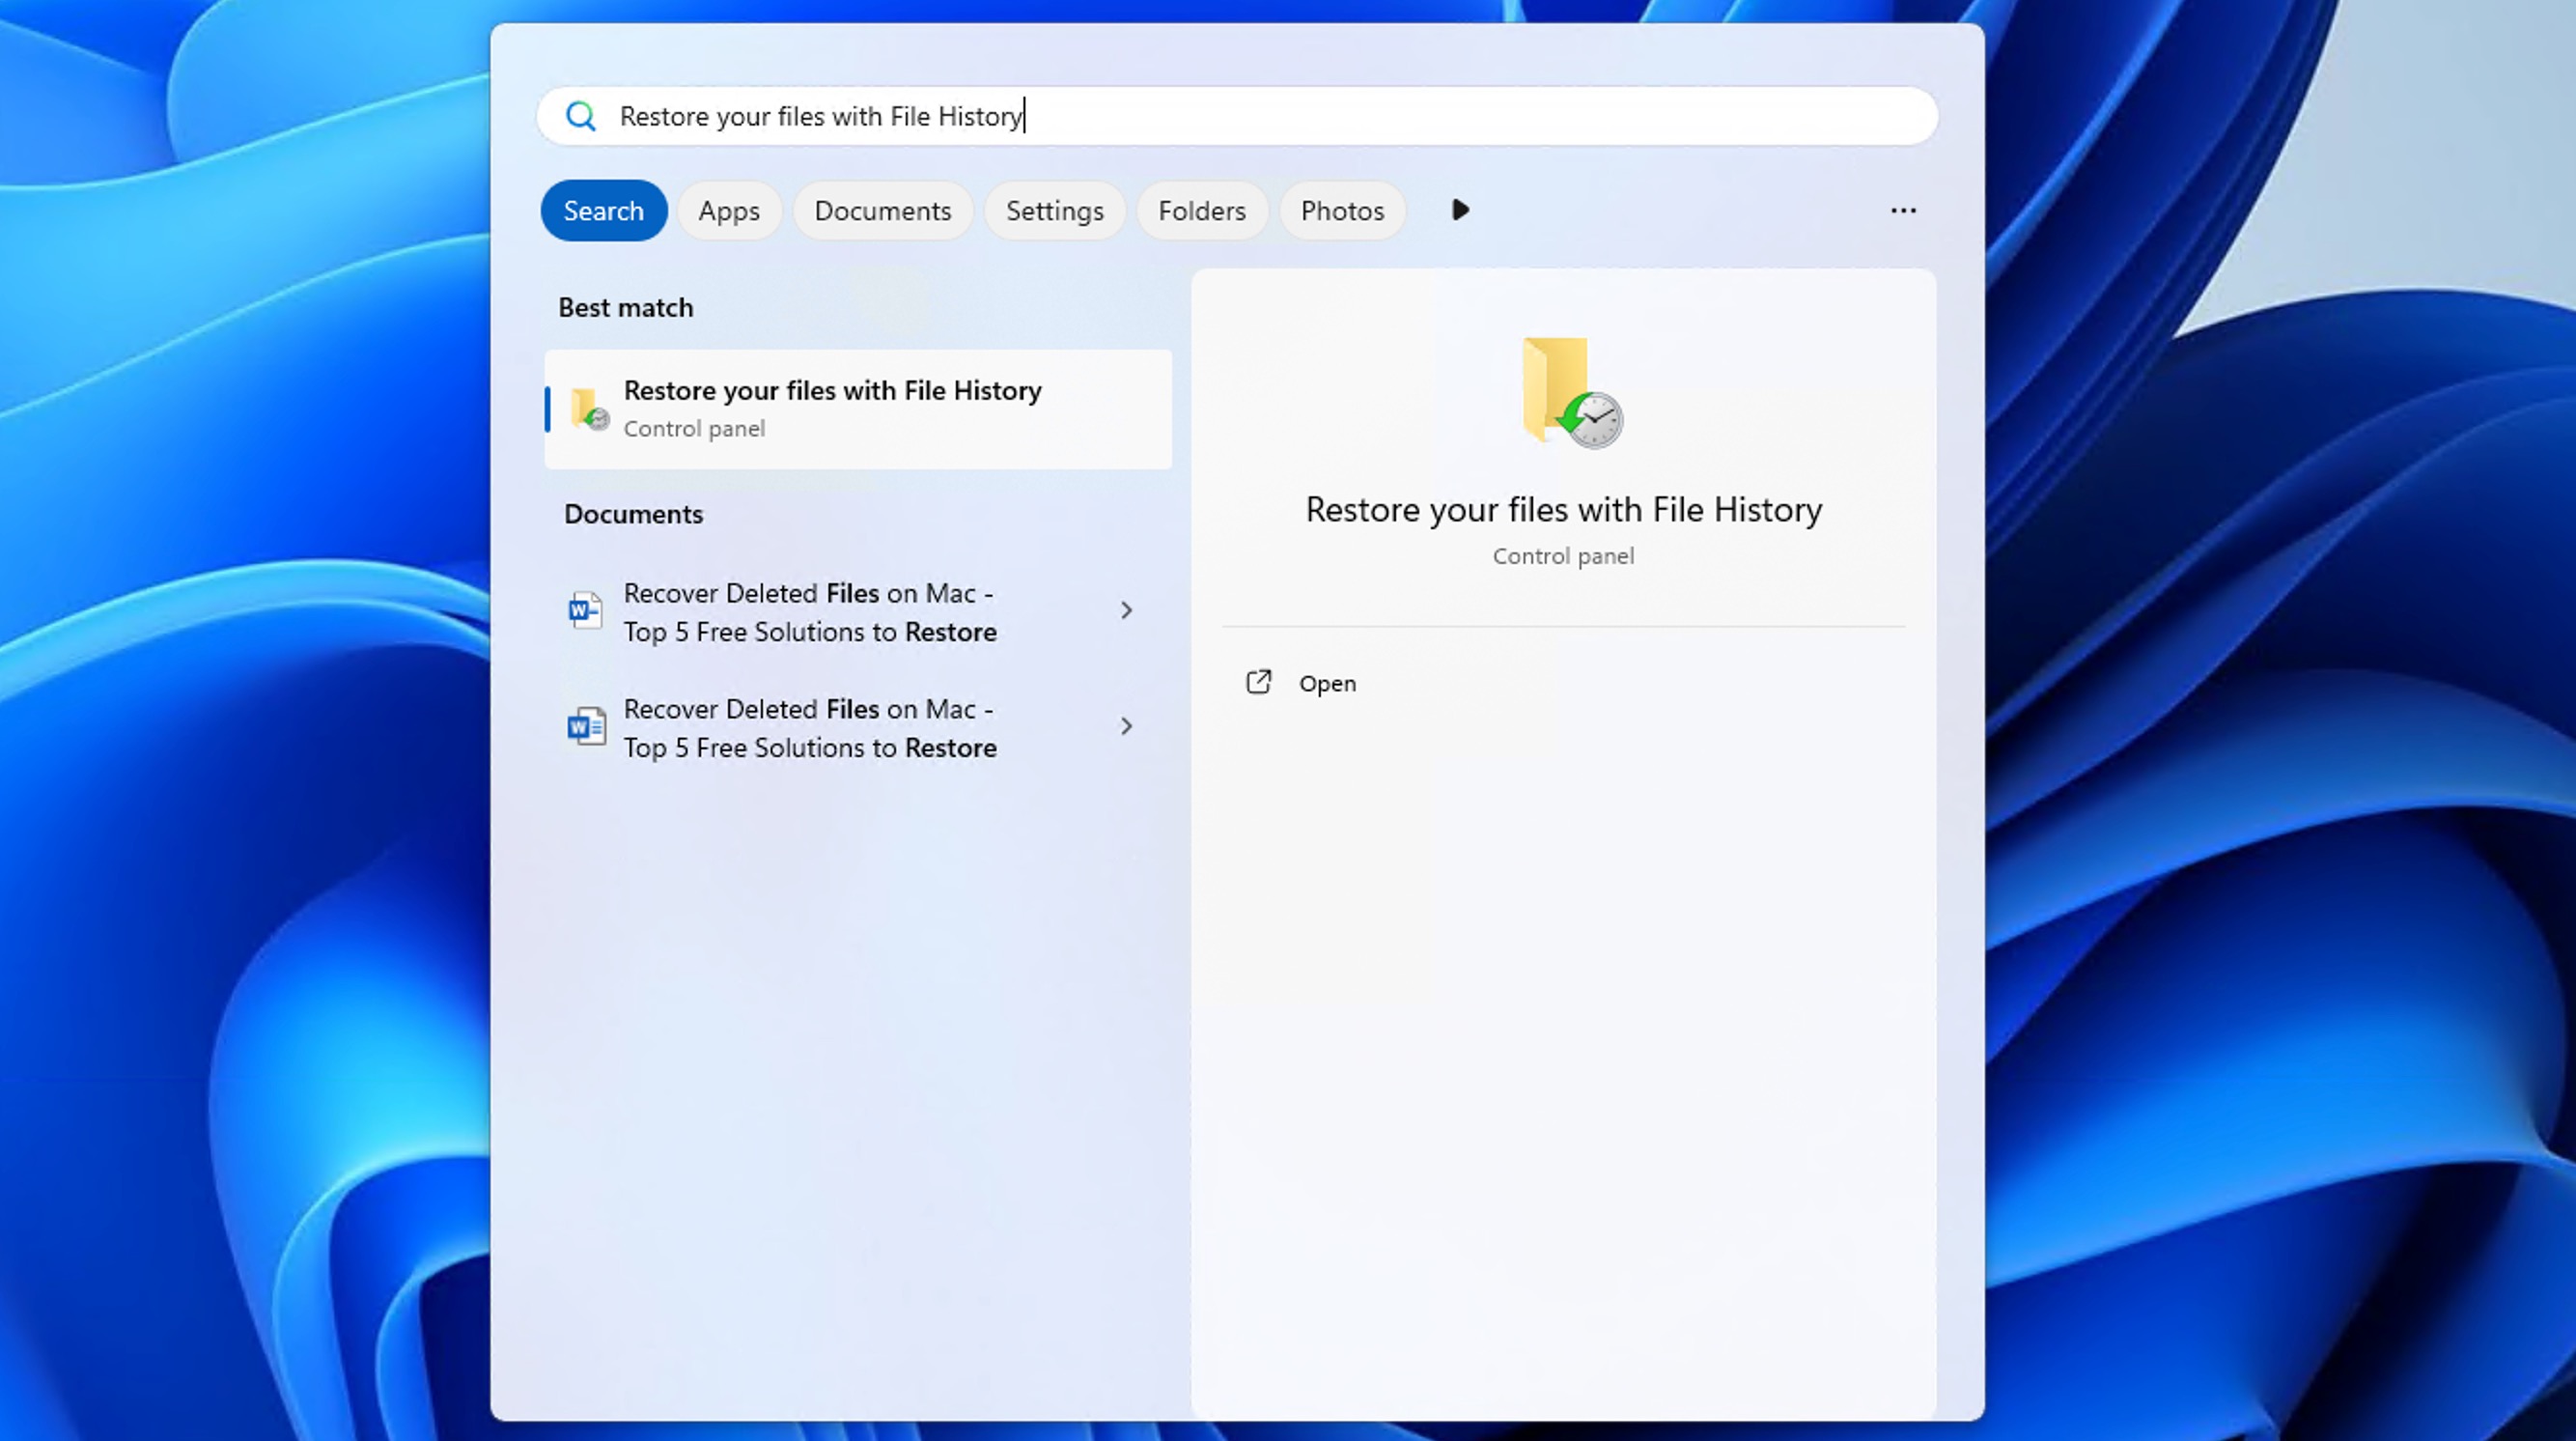
- Navigate through your backup history using the arrow keys to find the most recent working version of your files.
- Select the files or folders you want to restore.
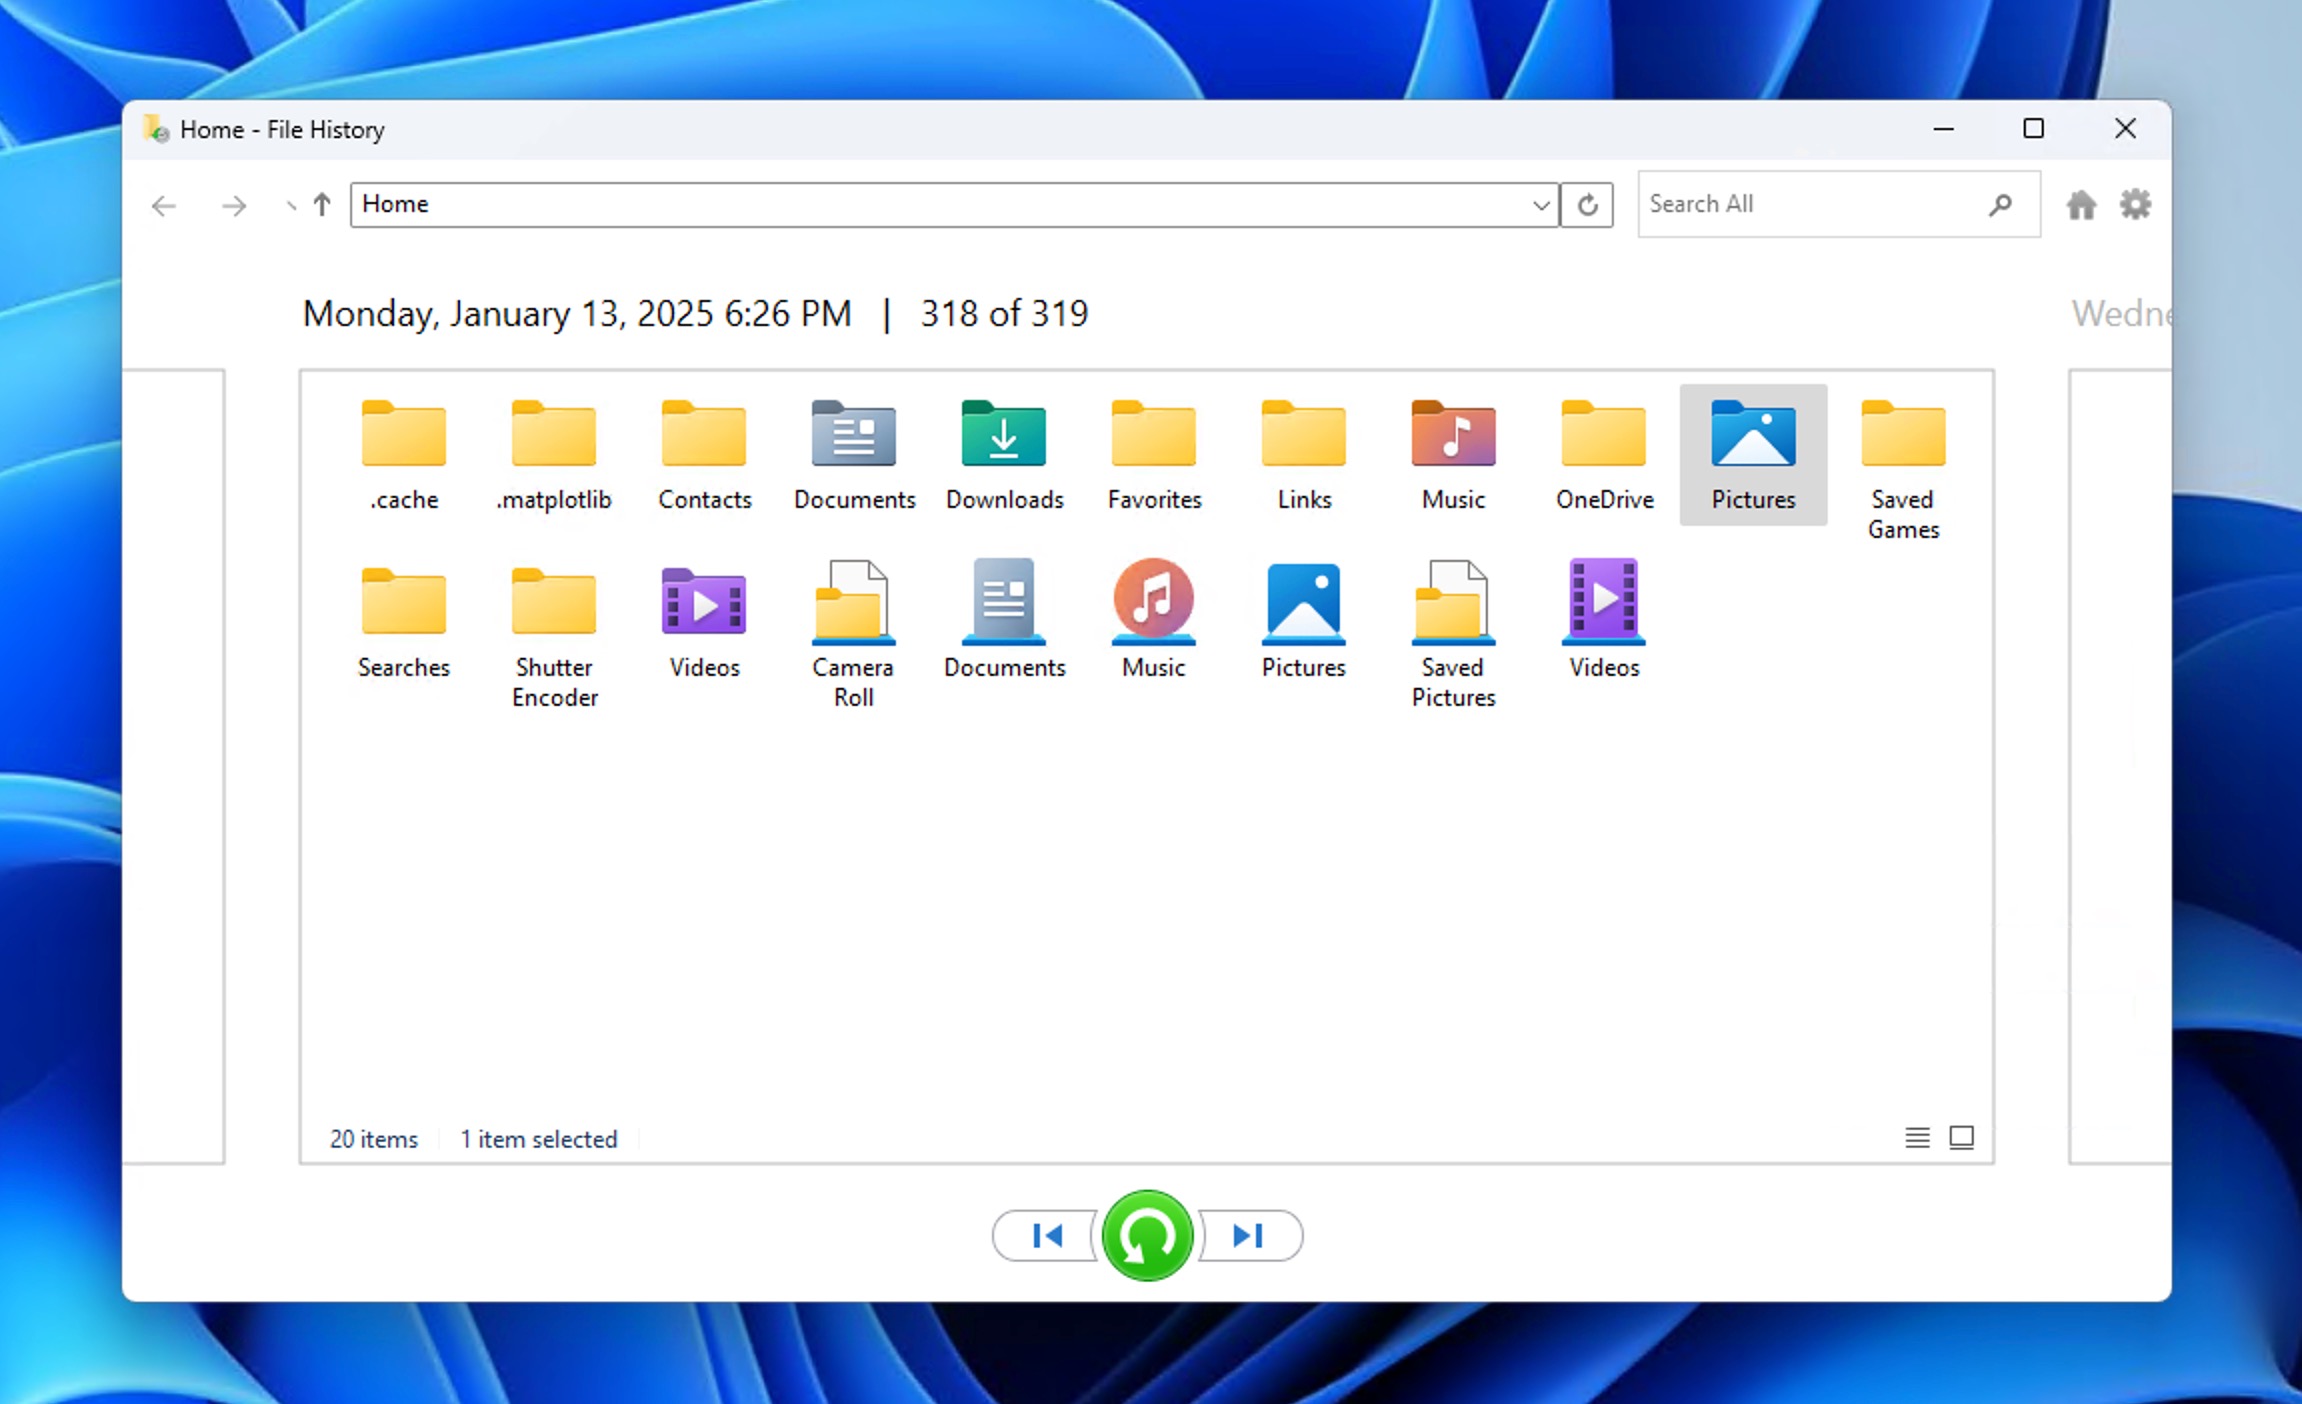
- Click the green Restore button to recover the files to their original location.
📝 Note: If you used a cloud sync service like Google Drive, Dropbox, or OneDrive, check it in your browser too.
Also check the service’s Trash, Deleted files, or Version history section. If the files were synced before the drive became RAW, you may be able to download clean copies without scanning the RAW drive.
Method 4: Ship the Drive to a Data Recovery Service
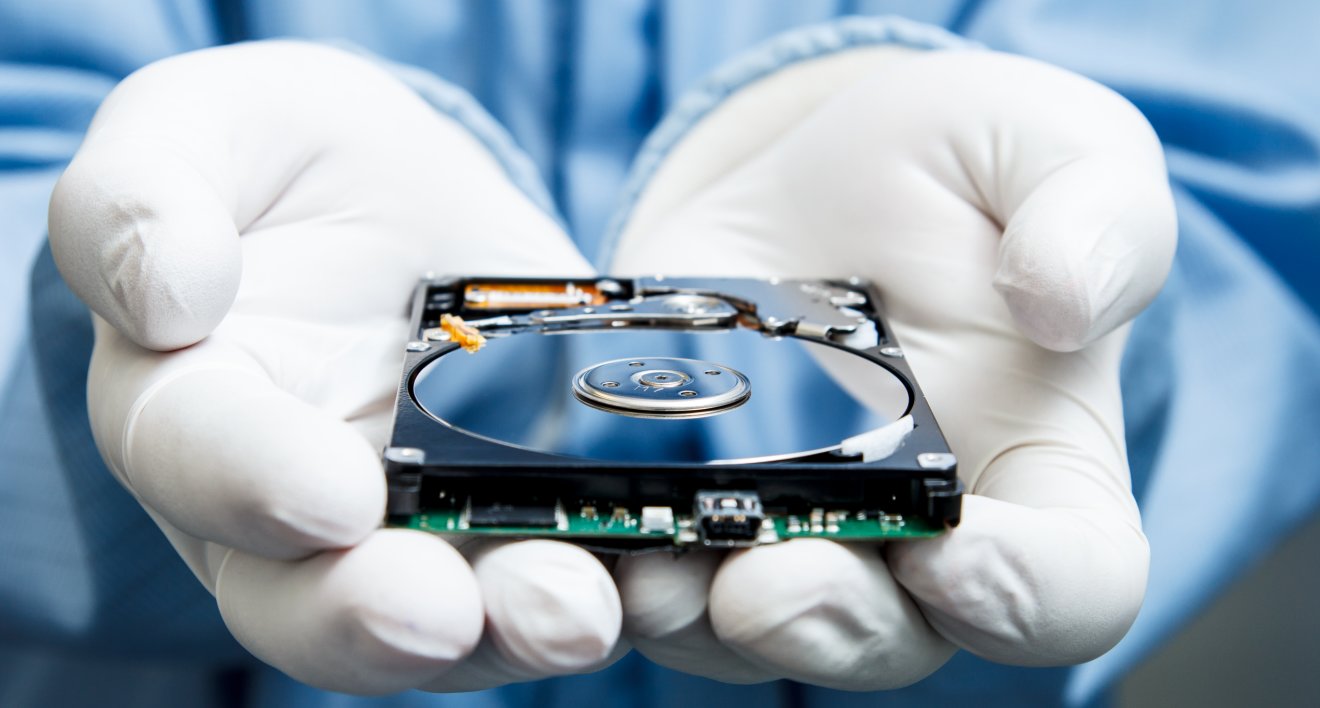
Just because DIY methods that let you recover data from a RAW drive are readily available doesn’t mean you have to do everything yourself. There are many professional data recovery services that would be more than happy to take a look at your drive and perform RAW disk recovery for you.
While certainly more expensive than DIY methods, and in many RAW drive cases, especially when the problem is a logical file system issue, the lab will often start with the same basic idea you can try at home: scan the drive with software and extract the files to a safe location.
Where a professional service makes more sense is when the drive is unstable. For example, it freezes during scans, disconnects, clicks, or contains work-critical files and you don’t want to take responsibility for the recovery attempt yourself. In those cases, sending the drive to a lab can be the better call.
How to Fix a RAW Drive
Now that you’ve secured your valuable files using one of the recovery methods described above, it’s time to fix your RAW drive and make it usable again. The methods below will help you repair or recreate the drive’s file system and restore it to normal operation.
Method 1: Fix Your RAW Drive without Formatting
Windows includes a built-in utility called CHKDSK (Check Disk) that can fix different file system errors. While CHKDSK typically cannot run on RAW drives since they lack a recognizable file system, there’s one exception where it can work.
This exception occurs when the drive was previously formatted as NTFS and became RAW due to a damaged boot sector. In such cases, CHKDSK may be able to identify the underlying NTFS file system and restore the boot sector from its backup copy, effectively returning the drive to its proper NTFS state. Here’s how to try CHKDSK in such cases:
- Open the Start menu, search “Terminal,” and launch it as administrator.
- Paste the following command inside the Terminal:
chkdsk X: /f(replace X with the letter assigned to the RAW drive). - Hit Enter on your keyboard and wait for CHKDSK to finish.
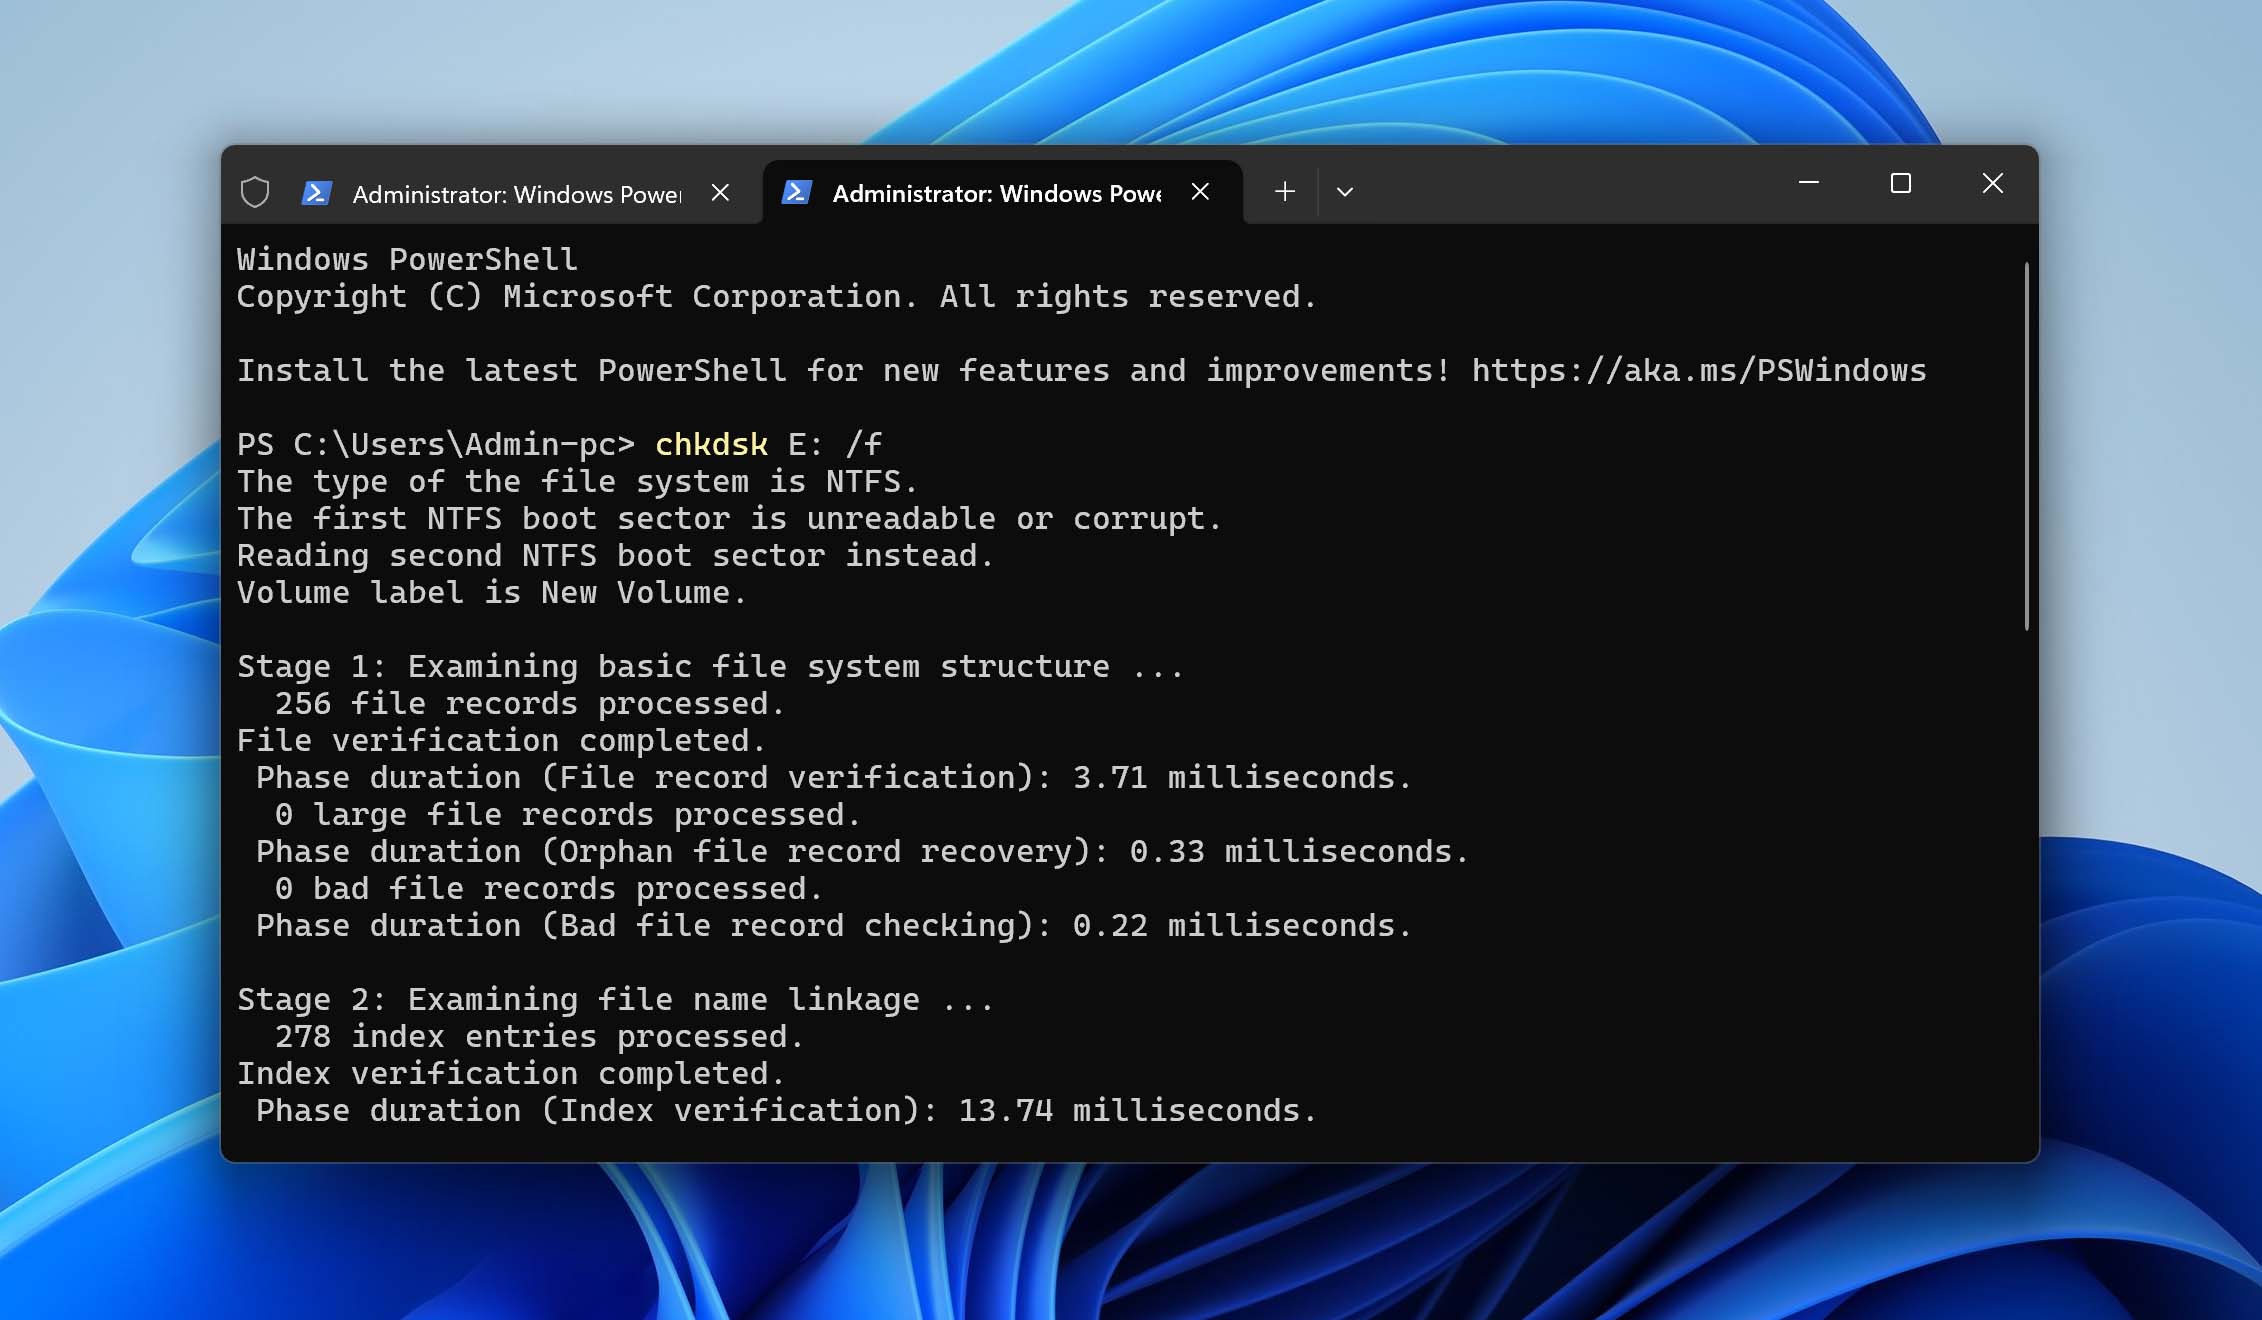
If CHKDSK doesn’t work for your RAW drive, that’s okay. This method is a long shot anyway; just move on to the next method.
Method 2: Fix a RAW Drive by Reformatting It
Since a RAW drive usually means Windows no longer sees a working file system, the most dependable fix is to format the drive again. If the drive itself is healthy and the problem is only logical, this should bring it back to normal without much drama.
But there’s the obvious catch: formatting will erase what’s on it. So use it only after you’ve already recovered your files, as was shown in the first part of our guide.
To format a RAW drive:
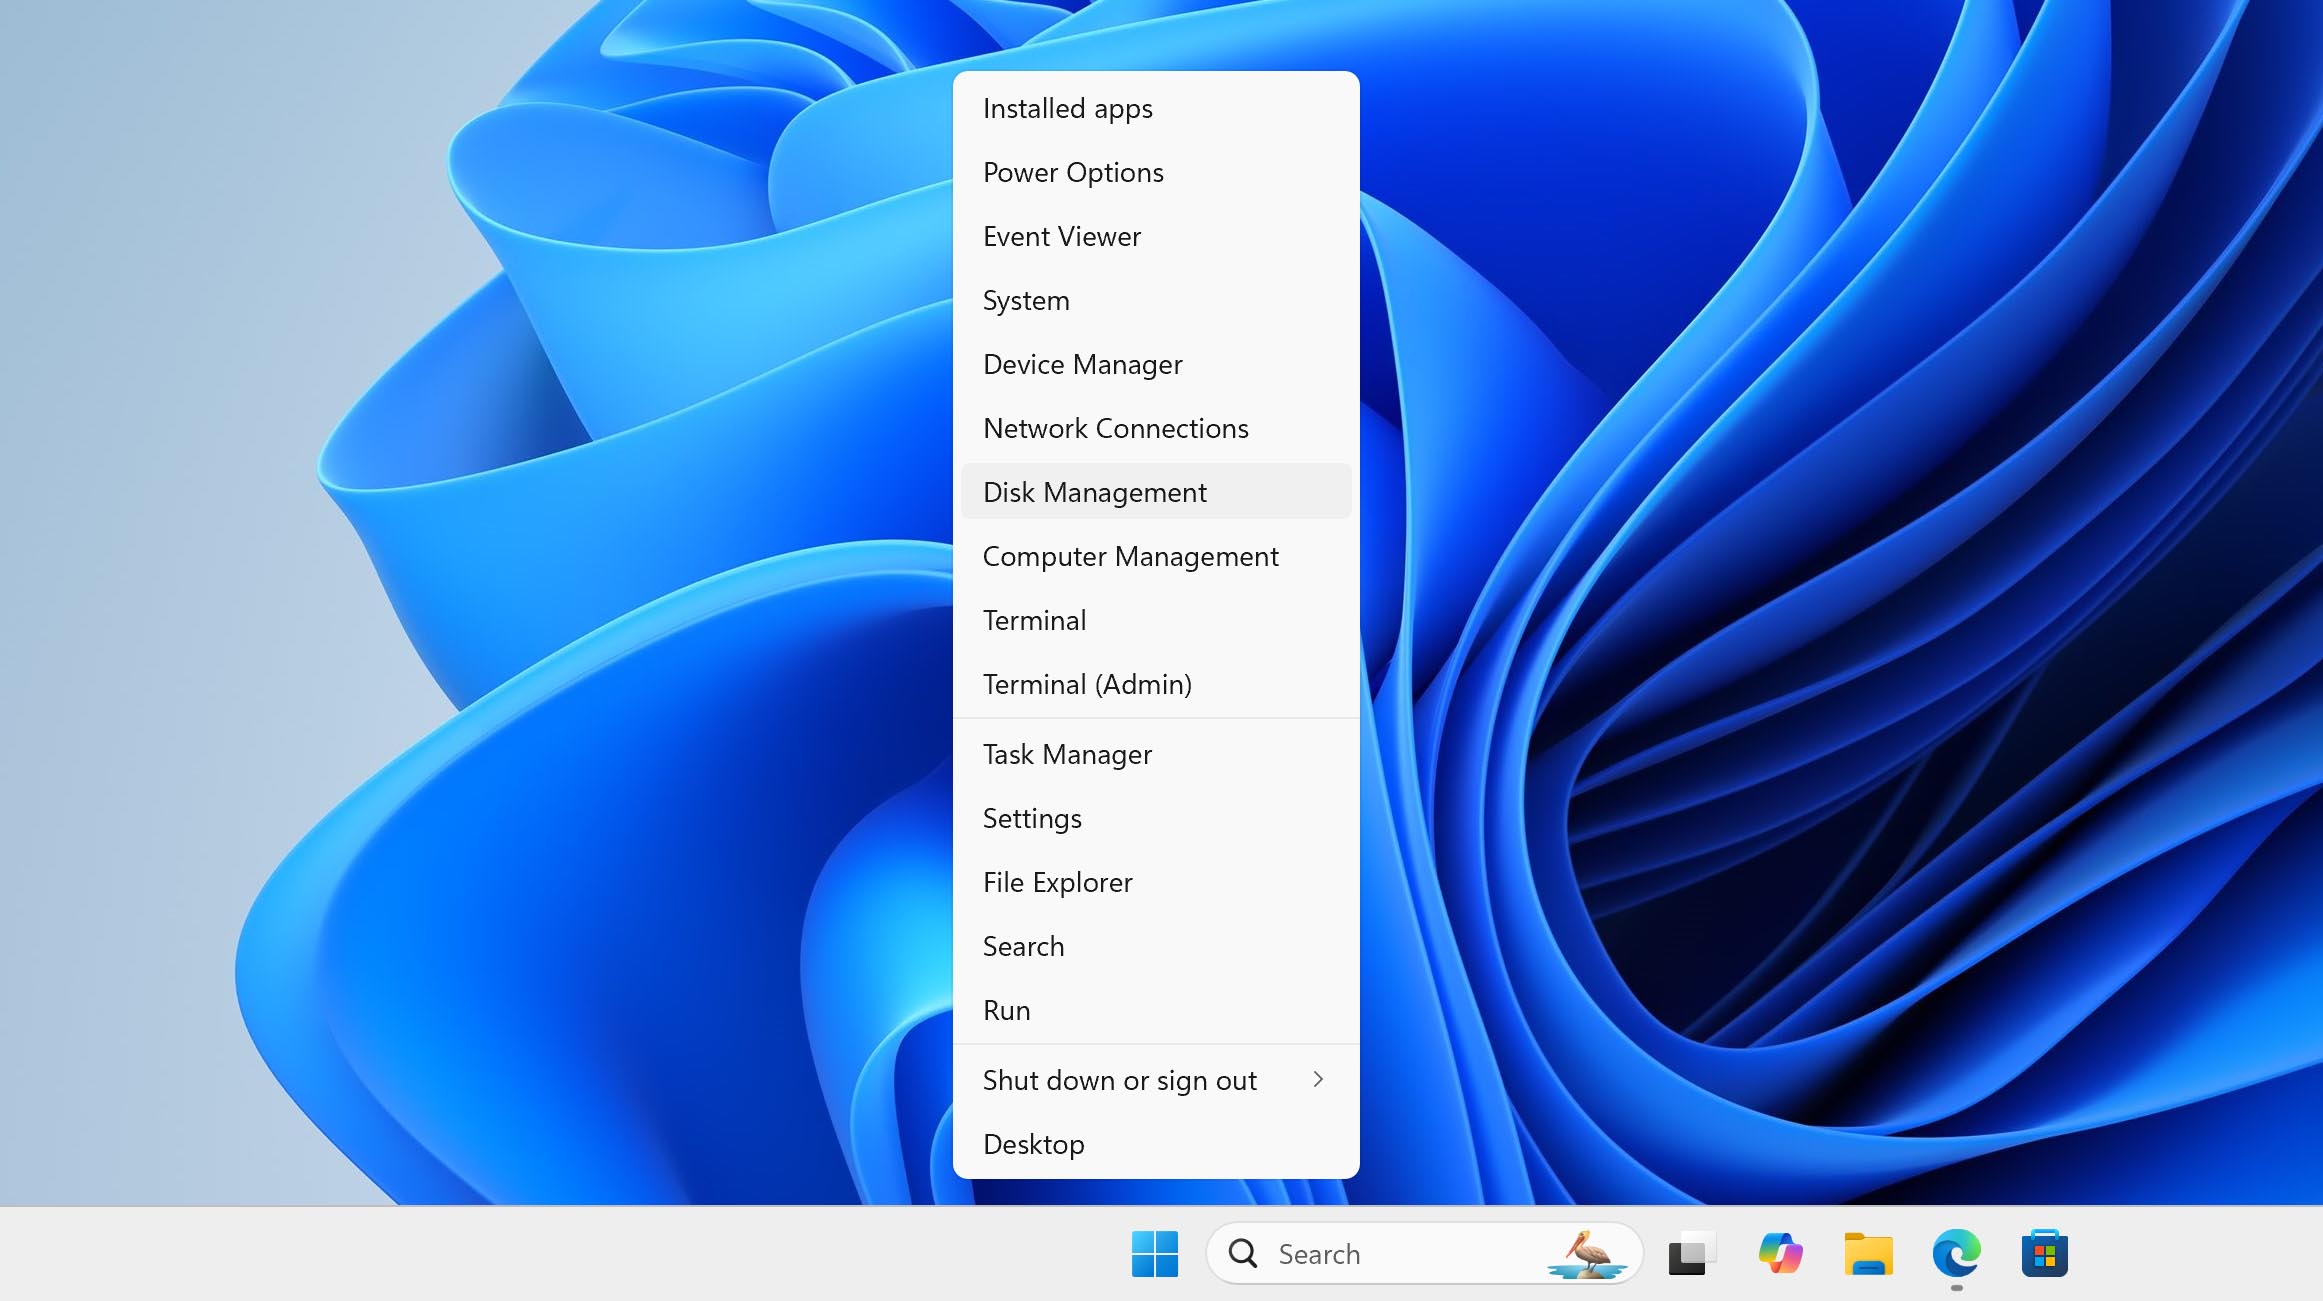
- Press Windows + X and select Disk Management.
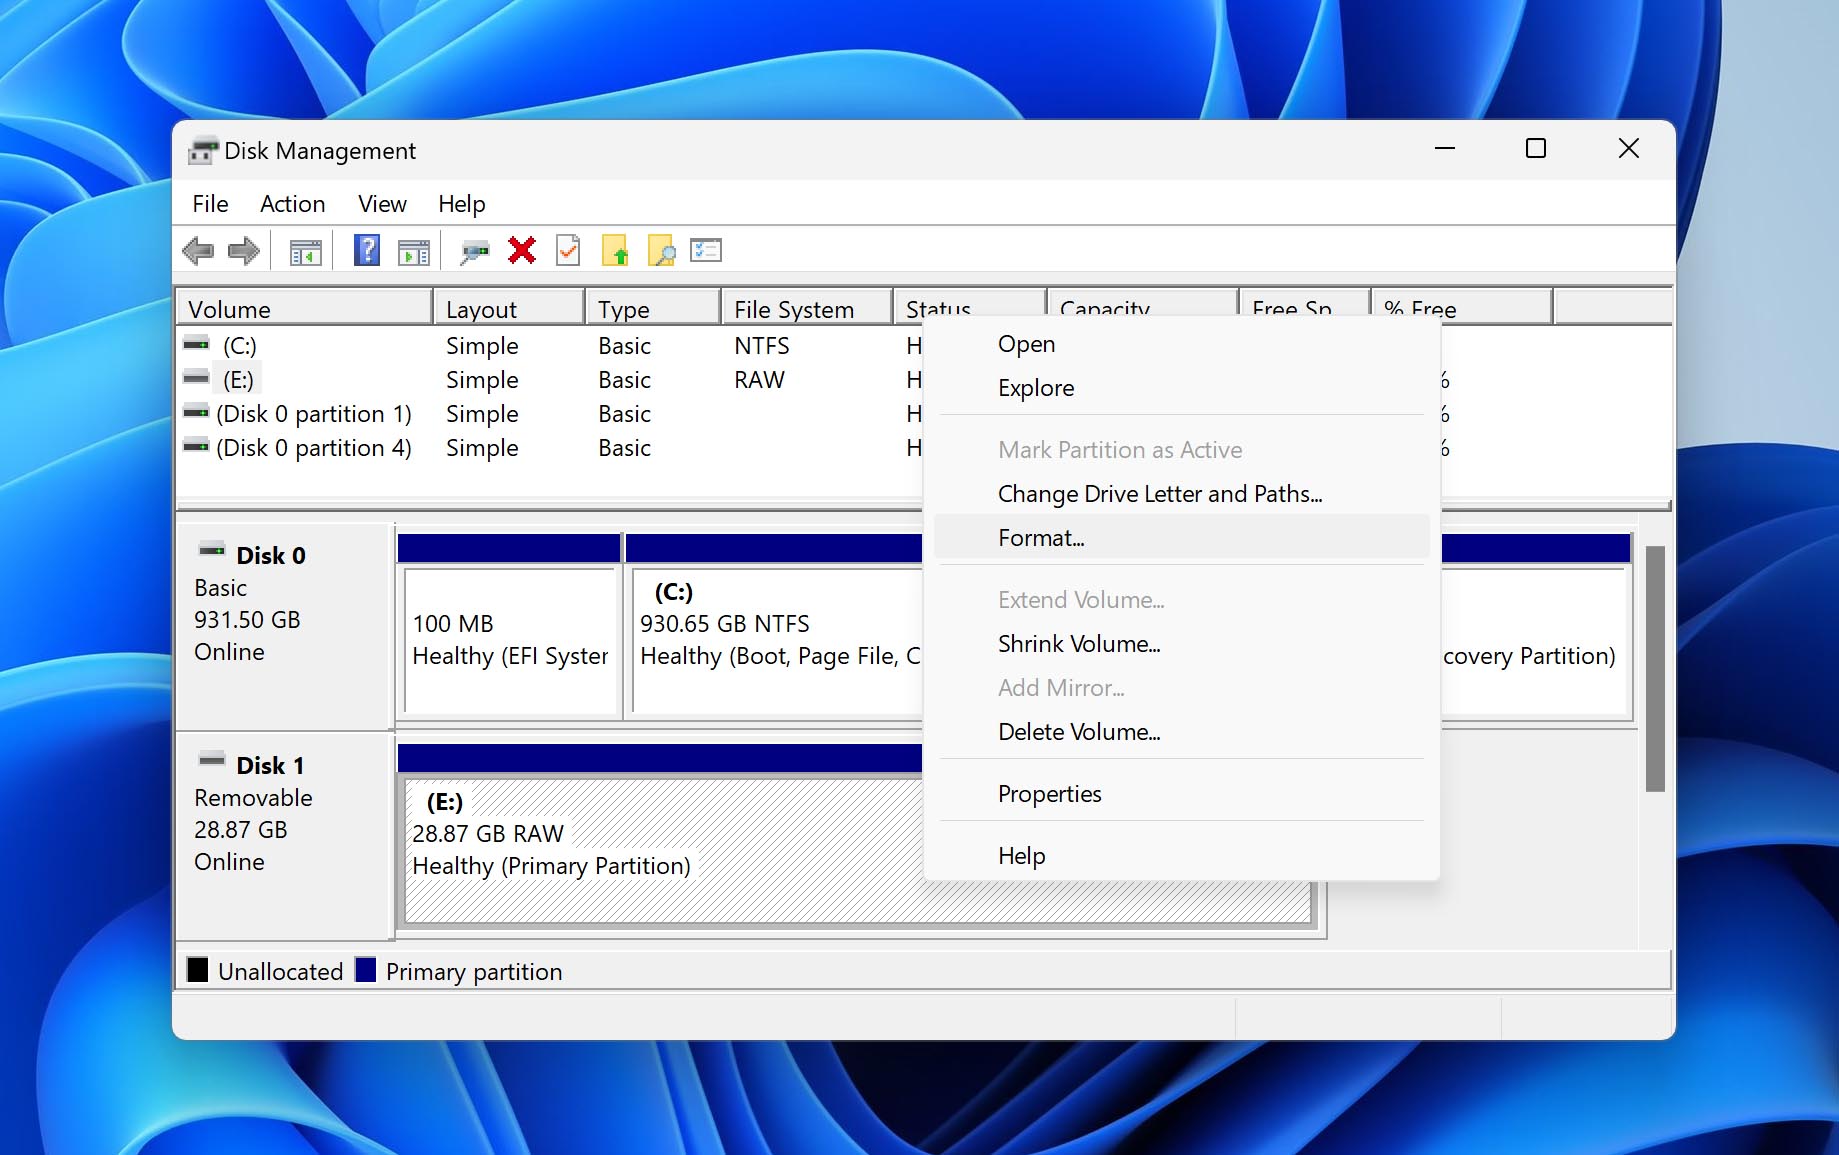
- Right-click the RAW drive and select the Format option.
- Choose your preferred file system and confirm.
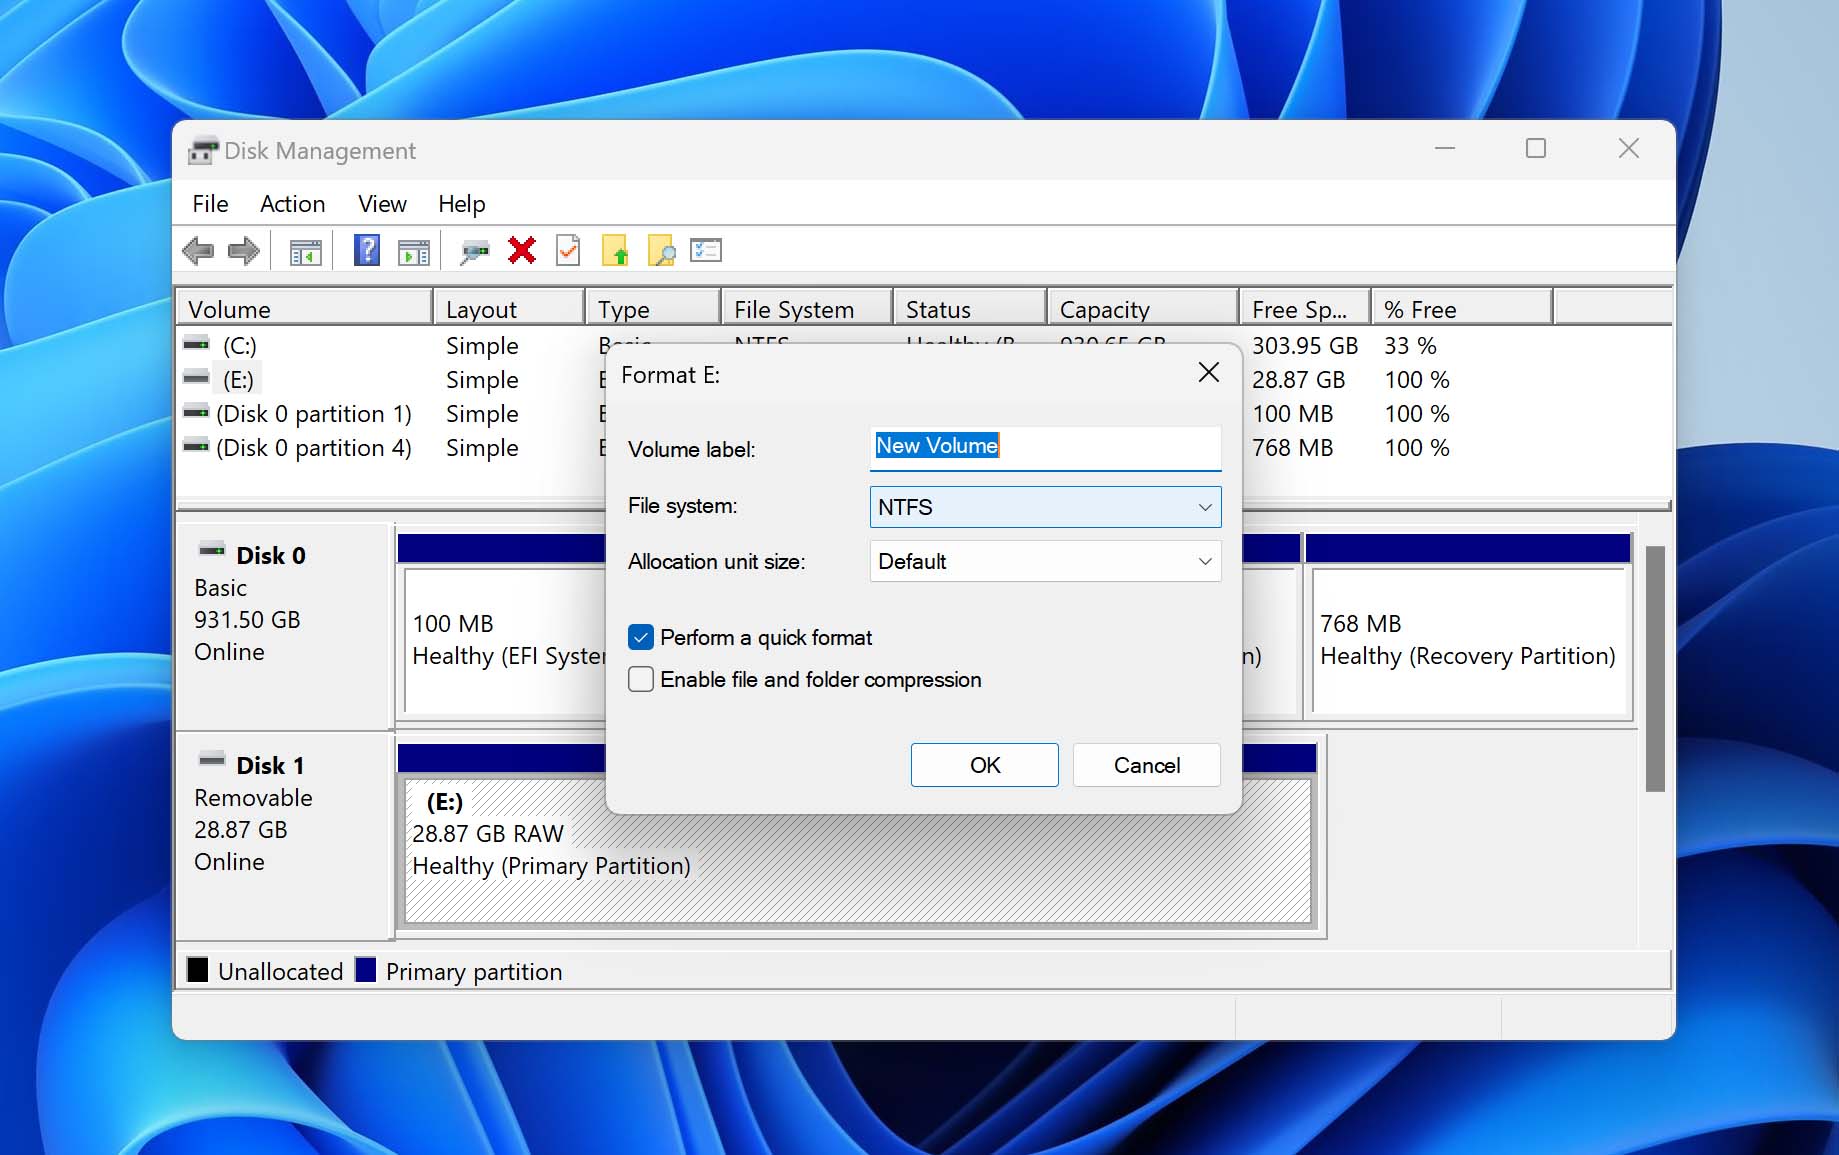
Best RAW Hard Drive Prevention Techniques
Once you recover your files and get the drive working again, the next question is obvious: how do you avoid seeing “RAW” label again?
There’s no setting that prevents every file system failure. But from what we’ve seen in recovery cases, a lot of RAW drive situations start with a few preventable habits.
- The first one is simple: don’t disconnect the drive while it’s doing something. If files are copying, a backup is running, or Windows still shows disk activity, wait. Then use Safely Remove Hardware before you unplug it. It is boring, but this is exactly the kind of boring habit that prevents corrupted file system metadata. Be careful with physical handling too, as one professional videographer on Reddit pointed out, even a small drop can cause serious failure.
- Power is another big one. Data recovery experts on Reddit often point to power issues as a major cause of drive problems. If you work with large drives, project files, video archives, or anything business-critical, a UPS is worth it. You don’t need a massive server setup. Even a basic UPS gives your PC enough time to shut down cleanly instead of cutting power while the drive is mid-write.
- Heat is another quiet drive killer. One member of a data recovery subreddit summed it up well: “Heat is the enemy of electronics.” We agree. Don’t stack external drives on top of each other, don’t run them under blankets or inside tight drawers, and give internal drives enough airflow. A warm drive during a long copy job is normal. A drive that feels hot to the touch deserves attention.
- We also suggest checking drive health from time to time. Tools like CrystalDiskInfo or Disk Drill’s S.M.A.R.T. monitoring can help spot warning signs: reallocated sectors, pending sectors, temperature spikes, or other values that start moving in the wrong direction. You don’t need to obsess over every number. But if a drive starts showing warnings, don’t wait for it to become RAW. Copy the important files to another disk while you still can.
- And of course, keep backups. That’s the tip everyone already knows, and somehow it’s still the one people skip. Follow the basic 3-2-1 idea: three copies, two different storage types, one copy away from the main device. Even a simple setup with an external backup drive + cloud storage is miles better than keeping the only copy on one aging disk.
These simple tips can greatly reduce the likelihood of your drive becoming RAW and you needing to perform RAW file system recovery.
Conclusion
If we simplify everything in our guide to one paragraph, RAW drive recovery is a two-part process:
- First, use a data recovery app like Disk Drill to scan the RAW drive and restore everything you need to another storage device.
- Then, and only then, format the RAW drive to NTFS (or whatever file system you need) so Windows can use it normally again.
Other methods can help in some edge cases, but if we’re talking about the most dependable approach for most RAW drive situations, this is it: recover data first, then format it.


FAQ
RAW drive recovery is the process of extracting files from a storage device that no longer has a functioning file system.
In some cases, RAW drives can be fixed using CHKDSK (but only in a specific scenario: the drive was originally NTFS, and Windows can still recognize enough of the file system structure to repair it):
- Press Win + X and select Terminal (Admin).
- Paste the following command inside Terminal: chkdsk X: /f (replace X with the latter assigned to the RAW drive).
- Hit Enter on your keyboard and wait for CHKDSK to finish.
A RAW drive cannot be accessed through Windows File Explorer or standard file managers since the operating system can’t read its file system structure. Fortunately, you can use specialized data recovery software like Disk Drill to scan and access the drive’s contents directly.
When dealing with a RAW SSD (Solid-State Drive), you can generally follow the same recovery and repair steps as you would for a traditional hard drive. We recommend attempting data recovery as soon as possible using specialized software like Disk Drill.
That’s common with RAW recovery. File names, folder paths, dates come from file system metadata, and that metadata may be damaged. In those cases, recovery software may still recover the file content but place files into generic folders with generic names.
